How to Screen Record on Mac (Easy Step By Step Guide)
Want to know how to screen record on Mac?
It’s super simple and can be done for free using Quick Time video player that is built into every Mac laptop or desktop.
Let’s just get right into the step by step guide for how to screen record on Mac.
You can record videos on a Mac using:
- The “Screenshot” toolbar for the newer versions of Mac (Mojave and Catalina).
- QuickTime Player, Mac’s built-in app (for all versions of Mac).
- Third-party apps like Screencast-O-Matic Snagit, Screenflow, etc.
Now, let’s walk through all these different ways to screen record on your Mac:
1. Screen Record on Mac (Mojave and Catalina) Using the Screenshot Toolbar.
Follow these simple steps to record your Mac’s screen on Mojave and Catalina using the Screenshot bar.
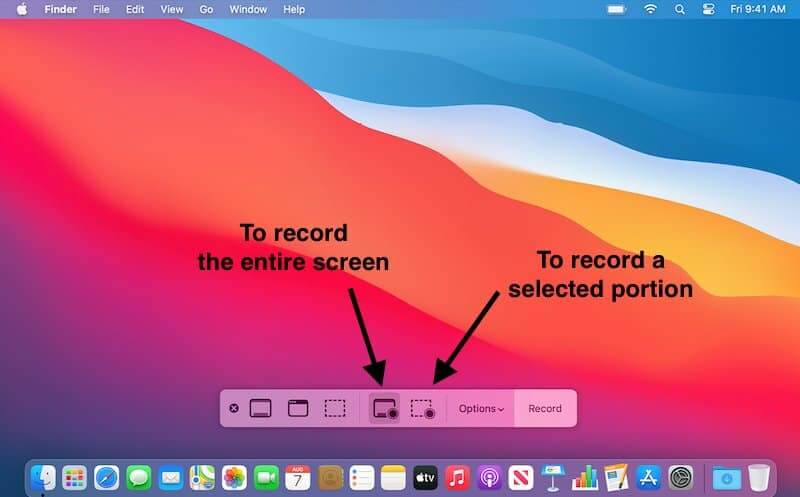
Step #1. Press Shift + Command + 5 Together.
Press the keys Shift + Command + 5 together to open the Screenshot toolbar.
You will see a toolbar at the bottom of your screen.

You can use this toolbar to:
- Grab still screenshots (the entire screen and for the selected portion).
- Record the whole screen.
- Record the selected portion of your screen.
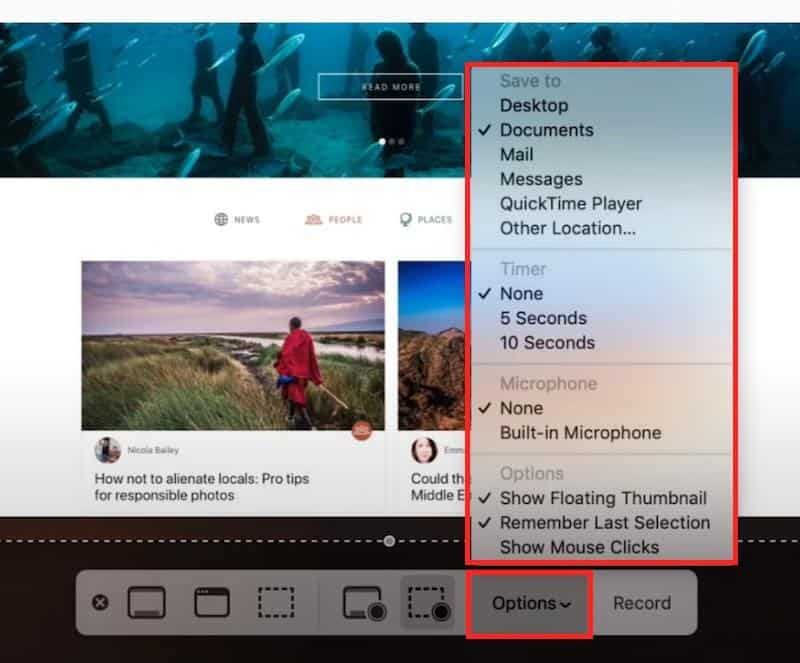
Step #2. Configure Your Screenshot Toolbar.
Before recording your screen, make sure to review your recording settings. You can set and adjust your preferences by clicking on the “Options” tab from the Screenshot toolbar.
The “Options” tab will let you change the following settings:
- Save To – You can choose where on your Mac you would like your recordings to get automatically saved, such as Desktop, Document, or Clipboard.
- Timer – There are a few different options for when to start recording on Mac. You could begin recording immediately or wait for 5 or 10 seconds before recording.
- Microphone – Mac lets you switch on your microphone for internal audio recording along with video recording. You can either select the built-in Microphone or connect another microphone compatible with your Mac. To capture video only, choose the “none” option.
- Show a Floating Thumbnail – You can opt whether to show the thumbnail right after your screen gets recorded or not.
- Remember Last Selection – You can choose whether you want to use the same default settings as last time you used the Screenshot tool.
- Show Mouse Clicks – When you record something, you can also choose to show a black circle around the pointer in the recording.
Step #3. Record the Whole Screen Or a Specific Section.
The process to screen record your entire screen or a portion of it is slightly different from here. You’ll have to select different icons for both.
Steps to Record Your Entire Screen on Mac.
- To record the entire screen, press the button that appears like a solid outlined screen with a circle in the corner. It will appear like this:


- Once you click on this screen icon, your cursor will turn into a camera

 .
. - Now click anywhere on the screen you want to record or select the “Record” option from the toolbar. Your screen will start to record immediately or after 5 or 10 seconds (based on your settings).
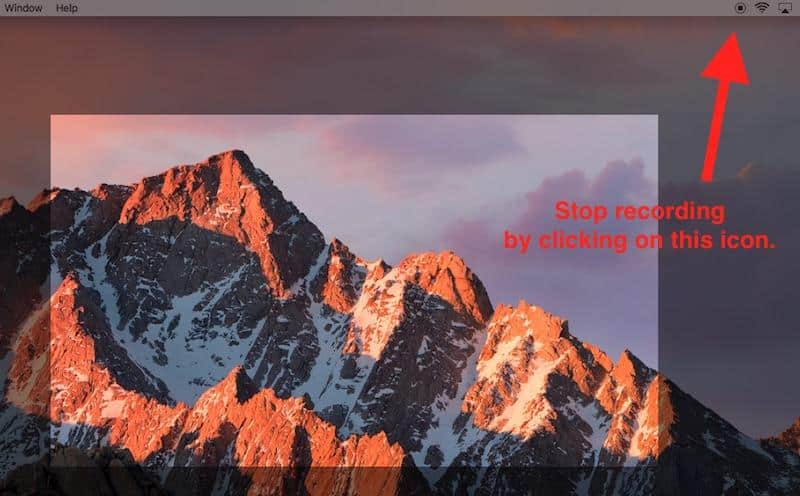
- To stop the recording, click on the “Stop” icon from the menu bar at the top of your screen. Here’s your “Stop” icon:

 . Alternatively, you can stop by pressing the Command-Control-Esc (Escape) buttons together.
Steps to Record a Portion of Your Screen on Mac.
- If you want to record a specific section of your screen, click on the dotted outlined screen icon. It will appear like this:

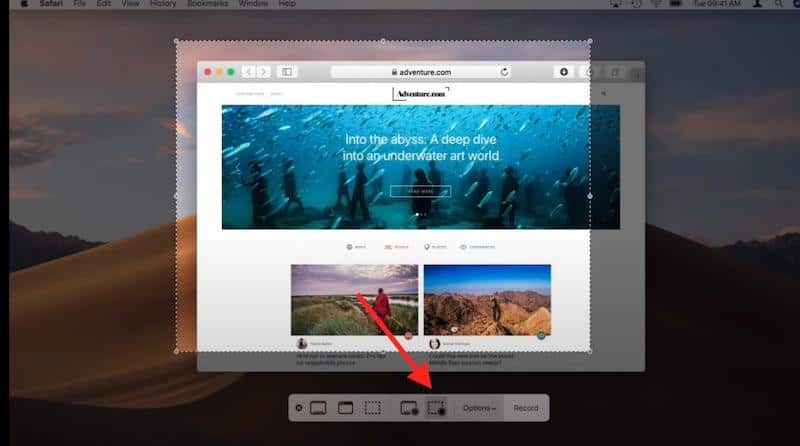
- After you press the dotted screen icon, a window will appear on your screen. Move this window to the part of your screen you want to record. You can also click and drag the window from corners to adjust the size.
- Now when you’re ready, click on the “Record” option. Your Mac will record everything that occurs inside your selected window.
- Finally, stop recording by hitting the Stop button or pressing the Command-Control-Esc (Escape) buttons together.
Step #4. Trim, Save or Share Your Recording.
Once you stop the recording, you can quickly trim, share, or save your video recording directly from its thumbnail.
- After you stop the recording, your video thumbnail will appear briefly on the lower-right corner of your screen. You can either ignore it or swipe it away to save, and it will get saved automatically.
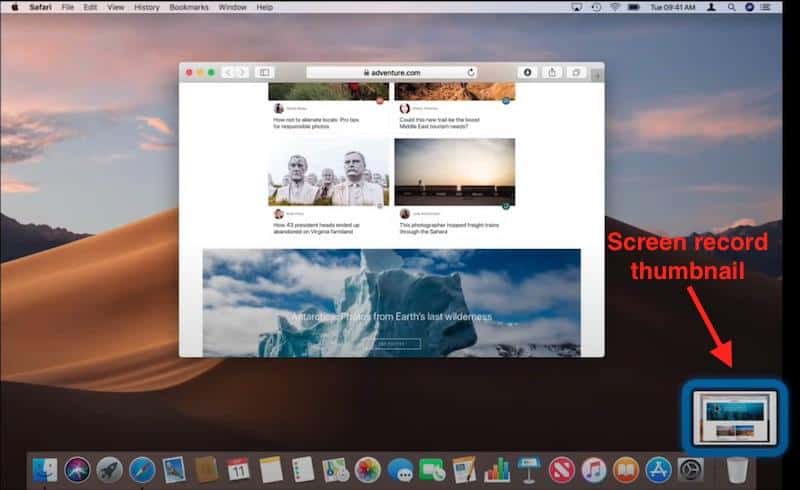
- You can also make quick adjustments, watch it back, or share it by simply clicking on it.
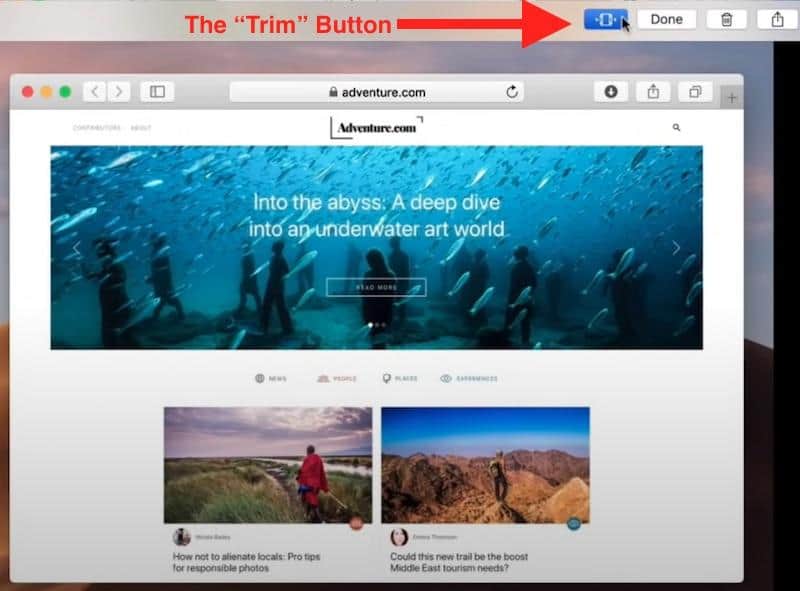
Trim Your Recording:
To trim the recording, click on the “Trim” icon ( ![]()
![]() ) from the option bar at the top.
) from the option bar at the top.
Next, move the sliders to select the part you want to keep – and eliminate the remaining parts. You can move the slider from either the left or the right position.
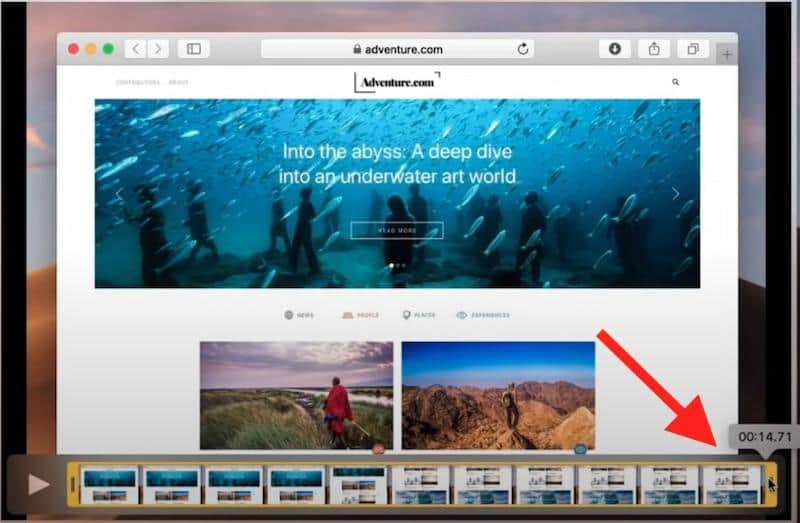
Click “Done” to save your trimmed recording.
Additionally, you can share the recording by clicking on the share icon ( ![]()
![]() ).
).
Explore the thumbnail to perform more instant actions. For example, you can quickly delete the recording without saving it, change its location, open it in a compatible app available on your Mac, and more.
2. Screen Record on Mac (All Versions) With QuickTime Player.
If you don’t have Mojave or Catalina, you can use QuickTime Player to screen record on all versions of Mac natively.
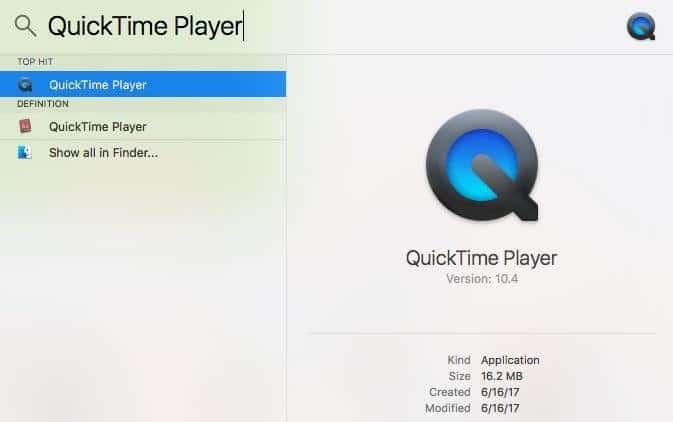
Open QuickTime Player from your Applications folder or through Spotlight Search.
Click on the File >> New Screen Recording option from the top-left menubar.
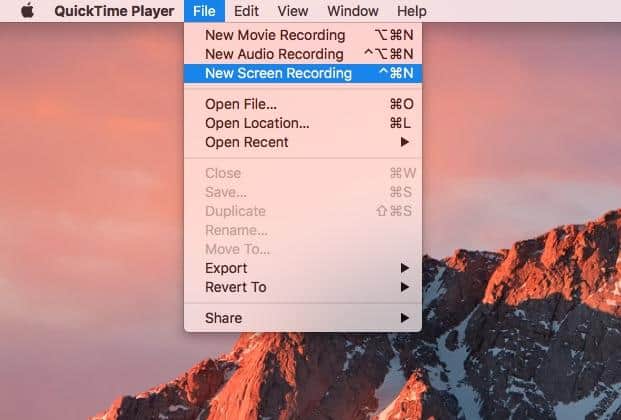
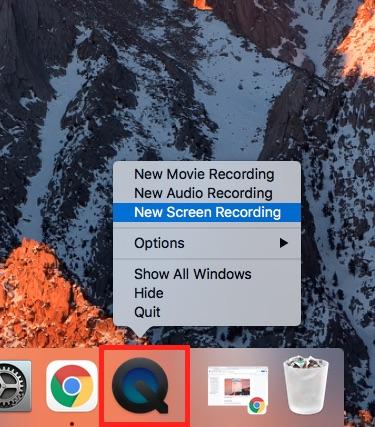
Or you can right-click on the QuickTime Player icon from your dock – and select the New Recording Option from there.
A pop-up Screen Recording will appear on your screen right away.
Before starting the recording, you can change the record settings by clicking on the arrow next to the Record Icon ( ![]()
![]() ).
).
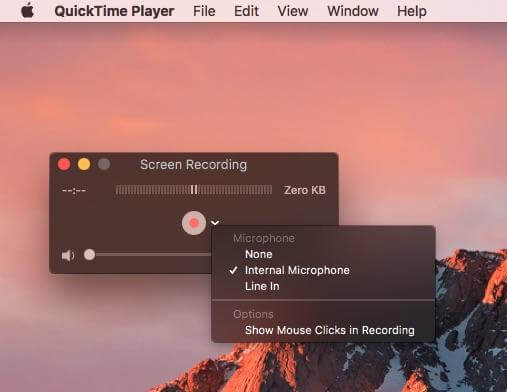
Choose a microphone if you want to capture audio or record your voice along with the video. To change the audio volume, adjust the volume slider.
If you’re ready to record, finally click on the Record Icon ( ![]()
![]() ) and perform any of these actions:
) and perform any of these actions:
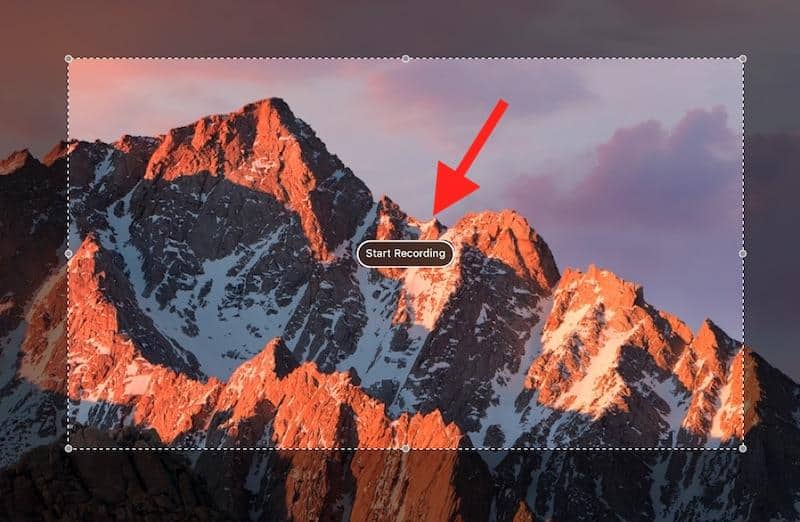
- Click anywhere on the screen to record that full screen.
- Drag the cursor to select an area to record that specific part of the screen.
If you plan to record the entire screen, the recording will start right after you click on the screen you plan to record.
Or, to record a section of the screen, click on the “Start Recording” option that will appear after you drag the cursor to select an area to record.
Next, click on the “Stop” button ( ![]()
![]() ) from the top-left menu bar or press the Command-Control-Esc (Escape) buttons together.
) from the top-left menu bar or press the Command-Control-Esc (Escape) buttons together.
Once you stop the recording, the final recorded video will appear automatically on your screen. Now you can further view, trim, edit, save, or share the video.
3. Screen Record on a Mac Using Third-Party Software.
Mac’s native screen recording tools won’t suffice for advanced tutorials, live streaming, and more.
For that, you need third-party screen recording software with advanced features. These tools come with additional benefits that are absent in QuickTime and Mac’s Screenshot Toolbar.
Besides regular screen recording features, they allow you to screenshot your scrolling content, screenshot videos and add music, animation, etc., to your recording.
Additionally, make sure to look for these features before you settle for a screen recording tool:
- Clean User Interface – To take the best screen record without any complications, look for an app with an uncluttered UI. But see that it has all the crucial features required to capture recordings within minutes.
- Integrations – When you need to capture several recordings, you’ll have to work in tandem with the cloud and other apps. These apps will let you stay organized, save and share your videos on the cloud, and more.
- Editing Features – An app with efficient editing features will let you cancel background noise, add voiceovers, enable smooth screen transitions, and more. Your software should also let you add motion and animation graphics to your recording.
- Data Security – Securing data is vital, especially when allowing an app to see everything on your computer screen. Ensure that your third-party recording app offers effective data security features.
- Self-Timer – A self-timer is necessary to screen record at perfect moments and pinning them to the desktop.
Best Screen Recording Software for macOS.
Here are some of the best screen recording software for a Mac:
1. Snagit.
Snagit is one of the best screen capture software for Mac. It lets you screen record within minutes, trim your video, and even use pre-built templates to create visual guides and tutorials.
Integration with numerous business apps – like Slack, Dropbox, YouTube, Twitter, Microsoft Word, Excel, Google Drive, and more – is also convenient. These integrations help you share and save your videos instantly.
Follow these simple steps to screen record on your Mac with Snagit:
Open Snagit and then choose the “Video Tab” from the capture window.
From the Video Tab, configure settings like:
- Preview in Editor
- Capture Cursor
- Record Microphone
- Record System Audio
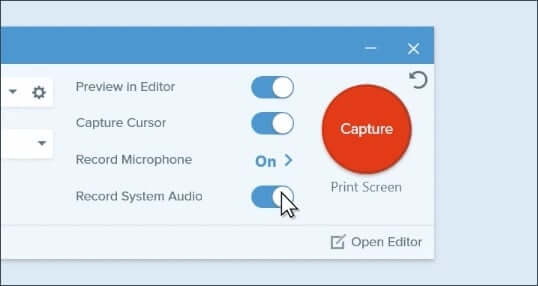
After selecting your video recording options, click on the big “Capture” icon.
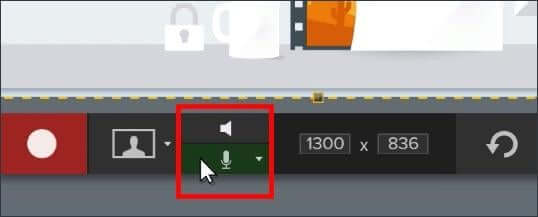
Next, a crosshair icon will appear on your screen that will allow you to select the screen to record. You can choose the entire screen or a particular section.
After that, choose the appropriate webcam and audio settings from the Video Toolbar. Finally, hit the red Record button to begin recording.
Snagit lets you pause and resume your recording any time you want. You can also change audio settings in the middle of the recording by hitting the pause button. You can even switch between the screen recording and webcam.
When you’re ready, you can hit the blue squared “Stop” icon.
The recorded video will automatically open in the Snagit Editor, where you can preview the recording, cut unnecessary sections, and make other edits.
Finally, save your video or share it directly from Snagit to several third-party platforms.
2. Screencast-O-Matic.
Screencast-O-Matic is a screen recording tool for Windows, Mac, iPhone, iPad, Android, and Chromebook. It has a free version that allows you to record the entire screen or a portion of the screen, add audio narration from a microphone, trim recordings, add captions, and more.
Although, you can’t record longer than 15 minutes with the free version.
The paid version offers more features like:
- The ability to publish to Vimeo or Dropbox.
- Draw while recording.
- Automated speech-to-text captioning.
- The ability to hide the cursor or the webcam.
- Animated overlays and transitions.
- Pan and zoom specific areas on your screen.
- And more.
Follow these steps to screen record using Screencast-O-Matic:
First, head to this link to launch the free recorder.
If it’s your first time, you’ll get prompted to install and download the software. Once installed, it requires just one click to launch.
The tool allows you to record the screen or webcam, or even both.
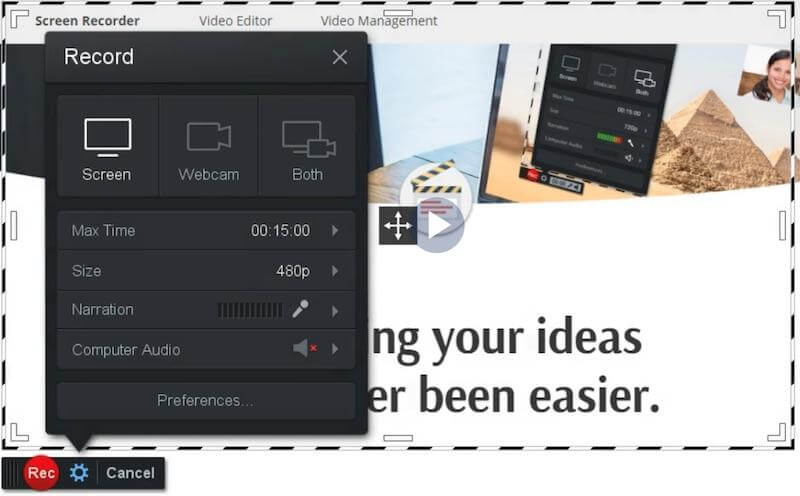
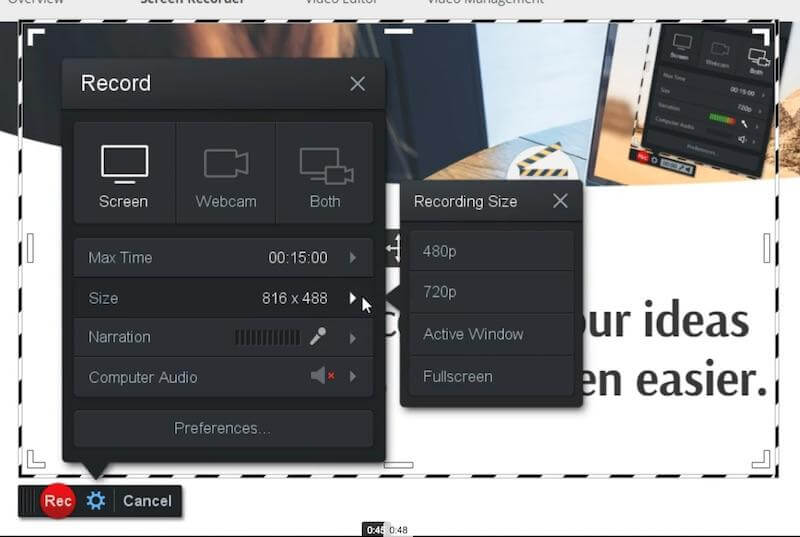
You can also configure the recorder by selecting the maximum time, size, narration, and computer audio.
Next, drag and resize the frame to record any part of your screen. Or you can select mentioned sizes, such as standard HD sizes and full screen.
Finally, hit the red “Rec” button to capture the action inside the frame.
Once started, you can also pause, resume, or preview any of your recordings.
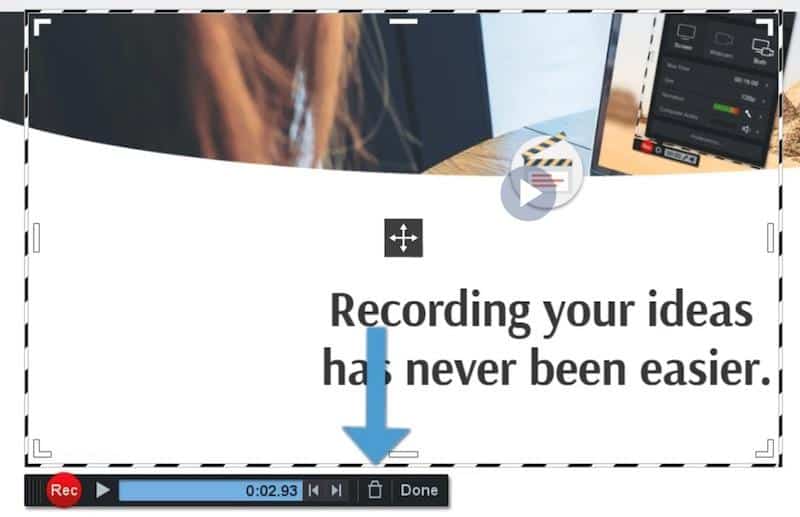
Click on the “Done” option,
Now, you can either save the video just as it is or proceed to trim it, add royalty-free music, etc.
Finally, you can save your video file on your desktop, upload it to Screencast-O-Matic, or share it directly on YouTube or other alternatives.
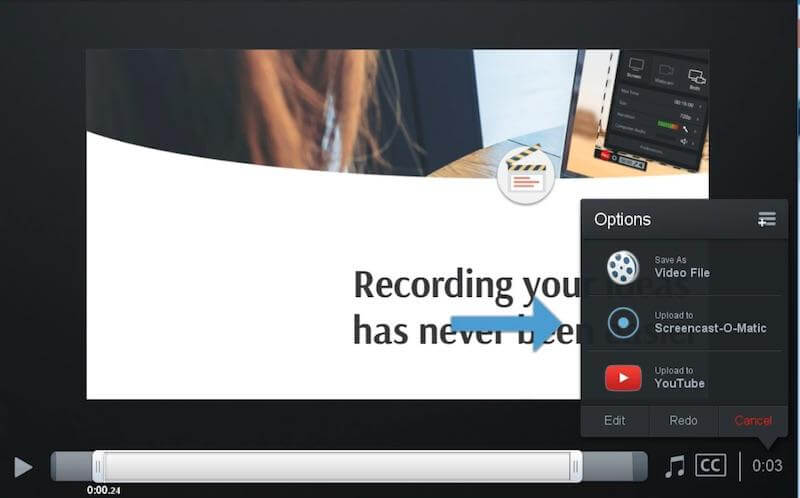
On the other hand, the paid plans will give you more uploading options, such as Dropbox, Google Drive, and Vimeo.
You can follow Screencast-O-Matic’s video tutorials to make the most of their screen recorder.
What Is Screen Recording?
The process of recording your computer’s screen allows you to show your screen as you work. In other words, whenever you record your computer screen, you are creating a video that displays everything you do on your device or laptop.
Video blogging, demonstrating a bug, and live streaming on platforms like Twitch are the most common reasons to screen record on a Mac.
Screen recording is also a useful skill if you need to create tutorials, walkthroughs, or anything else that requires showing your screen on YouTube, Podcasts, etc.
Or you might want to record your screen just to keep a copy of something significant that happened on your computer.
Executive Summary.
Screen recording on any Apple device is pretty straightforward. The macOS Mojave update made it even easier to screen record.
Now you can capture your screen, record tutorials, edit your recordings, and more with the press of a few buttons.
And for advanced recording and editing features, you can use screen recording software like Snagit and Screencast-O-Matic.
Make sure to check out my other guide that specifies the Ways to Take a Screenshot on a Mac.
Further reading on AdamEnfroy.com: Recording your screen is useful in various instances.
Whether you want to create a video tutorial, record webinars on your Mac, or show other people what you’re doing on your computer – screen recording can be handy.