How to Record a Webinar: Step By Step Guide for 2024
Have you ever watched a live webinar and wished to go back and watch it again?
Or maybe you’ve wanted to attend a webinar but can’t because of the time difference or your work schedule?
Luckily, with today’s technology, you can record a live webinar and watch it at your convenience.
While the best webinar software will typically have a “record” button in the control panel, not all do.
Whatever your situation, in this post, I’ll show you how to record a webinar step by step on various devices so that you can watch it later, share it with others, or edit it before it goes live.
Steps To Recording A Webinar
While you can record webinars in various ways, there are generally a few consistent steps, no matter your method.
Here are the typical steps to take when recording a webinar.
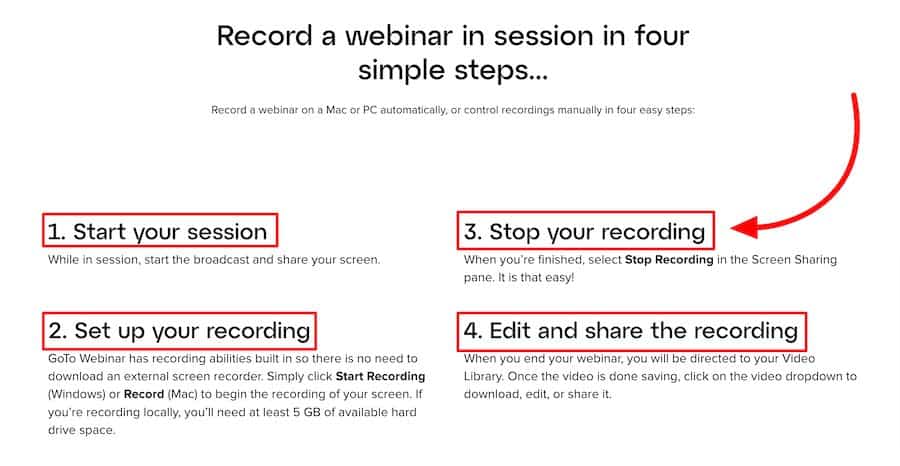
Step 1. Join Your Session
The first step in video recording a webinar is to join the live session as you normally would.
It will ensure you see and hear everything during the webinar.
Step 2. Start Your Screen Recording Software
Open the screen recording software you plan to use (more on this in the next section).
Consider the region of your screen you are recording – if you go for the whole screen, you will capture everything that appears on your monitor.
If you’re only interested in part of the screen, focus the recording on a particular window or region.
Some programs also let you record audio from both your microphone and the system audio simultaneously.
With this, you can add commentary to the webinar or can’t hear the audio and want to comment as things happen.
Some software allows you to use your webcam to record a video of yourself and the screen recording.
While this isn’t required, it can be helpful if you want to add your reactions or commentary to the recording process.
A new screen recording starts with a button click or a keyboard shortcut.
Press that, and the software will typically start recording after a countdown timer.
Step 3. Stop Your Recording
Hit the stop button to end the recording.
Also, use a keyboard shortcut if your program has one.
Again, this depends on your software, but if you’re using the former method, it should be easy to identify which button to press.
Step 4. Confirm The Recording Was Successful
Most screen recording software will save the video file automatically, but it’s always a good idea to check that the recording was successful and saved correctly.
Open the folder storing your videos and look for the webinar recording.
If the software automatically uploads your recording to the cloud, ensuring you can playback this recording doesn’t hurt.
Step 5. Edit and share the recording
Do a few things before sharing your webinar recording regarding video editing.
First, trim the video to include only the relevant parts.
Add annotations, captions, or transitions if desired.
Share the recorded webinar with the appropriate people.
Recording A Webinar On Different Devices
In this section, I’ll show you the steps to record webinars on various operating systems.
Depending on your device, you can access screen recording controls in multiple ways or use third-party software to get more features.
Consider that various recording options have different file formats, which might be incompatible with some playback devices.
However, if this is the case, you can convert the file later using one of the many available services.
How To Record A Webinar On Windows
To begin recording your screen on Windows, use the pre-installed, free screen recorder found within the Xbox Game Bar tool.
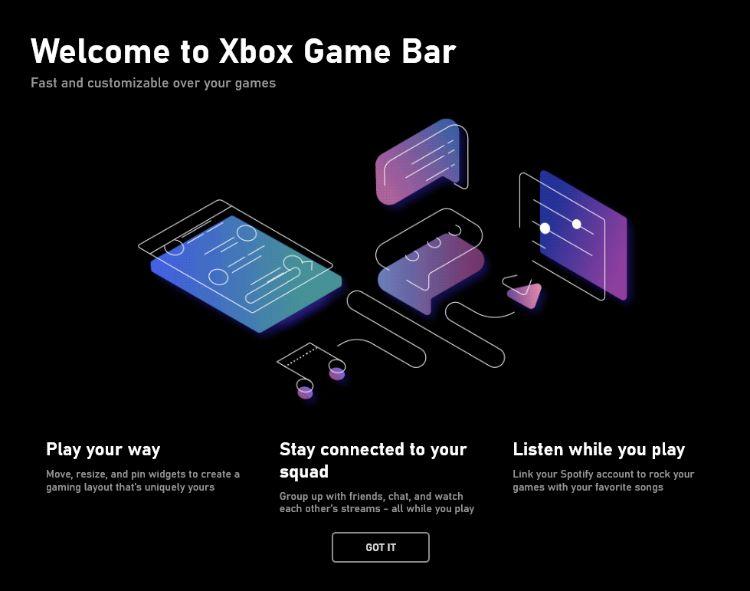
Here’s how to start a recording with Xbox Game Bar:
- First, ensure you’re on the webinar screen.
- Then, press the Windows key + G to open the Game bar.
- Note that this shortcut only works if the app or game runs in full-screen mode.
- If the Game bar doesn’t appear, ensure you’ve turned on Game Mode in Windows Settings.
- Once the Game bar opens, you’ll see a menu with several options along the top.
- Click the Record button (or press the Windows key + Alt + R) to record your screen.
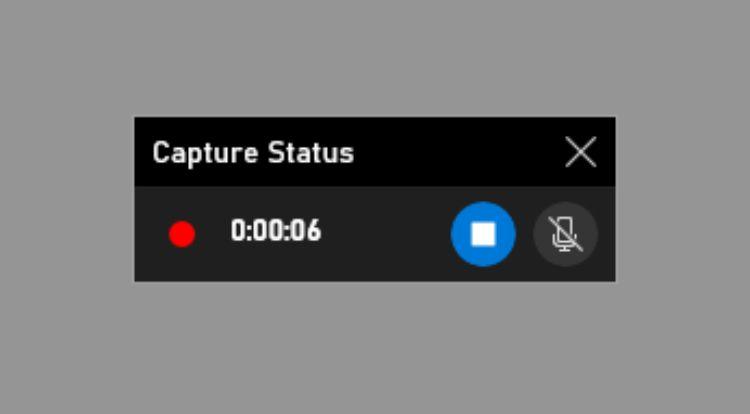
To stop recording, click the red button or press the Windows key + Alt + R again.
How To Record A Webinar On A Mac
There are a few different ways to record your screen on a Mac.
Amongst other methods, Mac users can use the QuickTime Player app installed on every Mac OS.
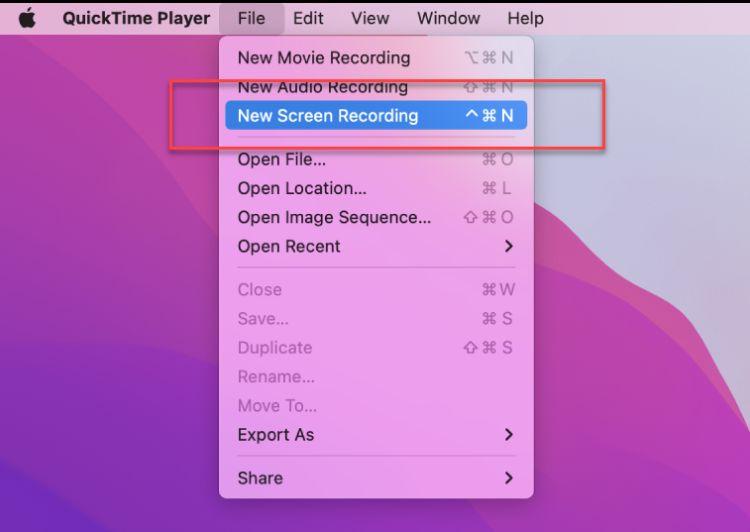
Here’s how to use QuickTime Player to record your screen:
- First, open the screen to record
- Then, open QuickTime Player from your Applications folder.
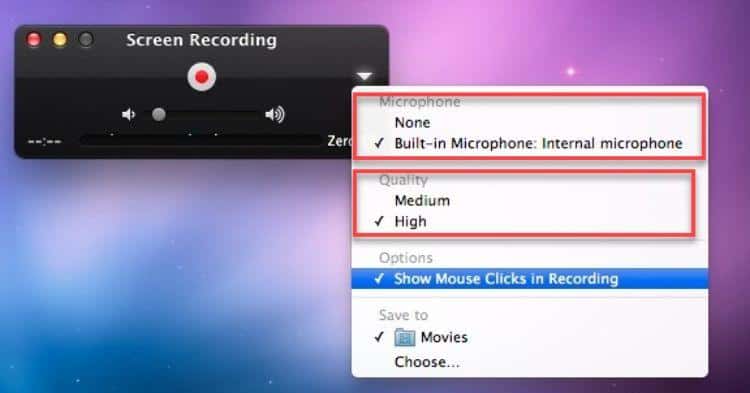
- In the QuickTime Player window, click file> New Screen Recording.
- A pop-up window will appear with several recording options.
- Here, you can record your entire screen or just a portion.
- You can also decide whether to include audio in the recording.
- If you also want to capture audio from your microphone, ensure you enable the correct option.
- If you’re going to record system audio (like music playing in the background), click the Options button and check the box next to Include audio in the recording.
- Once you’ve selected your recording preferences, click the Record button.
QuickTime Player will then start recording your screen.
Choose the ‘Stop’ option in the menu bar to stop recording.
Press Command + Control + Esc.
You will then end up with an MP4 video file.
When recording a webinar on a Mac, it’s good to know that you can use Quicktime only to record the audio.
How To Record Your Webinar On Linux
Linux users can take advantage of the built-in screen recording tool by using the Command Line Interface (CLI).
To start a recording, use the following command:
$ffmpeg -video_size 1024×768 -framerate 25 -f x11grab -i :0.0+100,200 output.mp4
Replace the values in bold with your own preferred settings:
- video_size The size of the video recording.
- Framerate: The frame rate of the recording (in frames per second).
- i: The number of your screen, which is usually 0.0.
- +100,200: The starting coordinates of the recording area on your screen (x and y values).
- output.mp4: The filename and file format of the recorded video.
Look at how to use FFmpeg on their wiki page.
How To Record Your Webinar With A Built-In iOS Tool
The recording tool on an iOS device is easy to access.
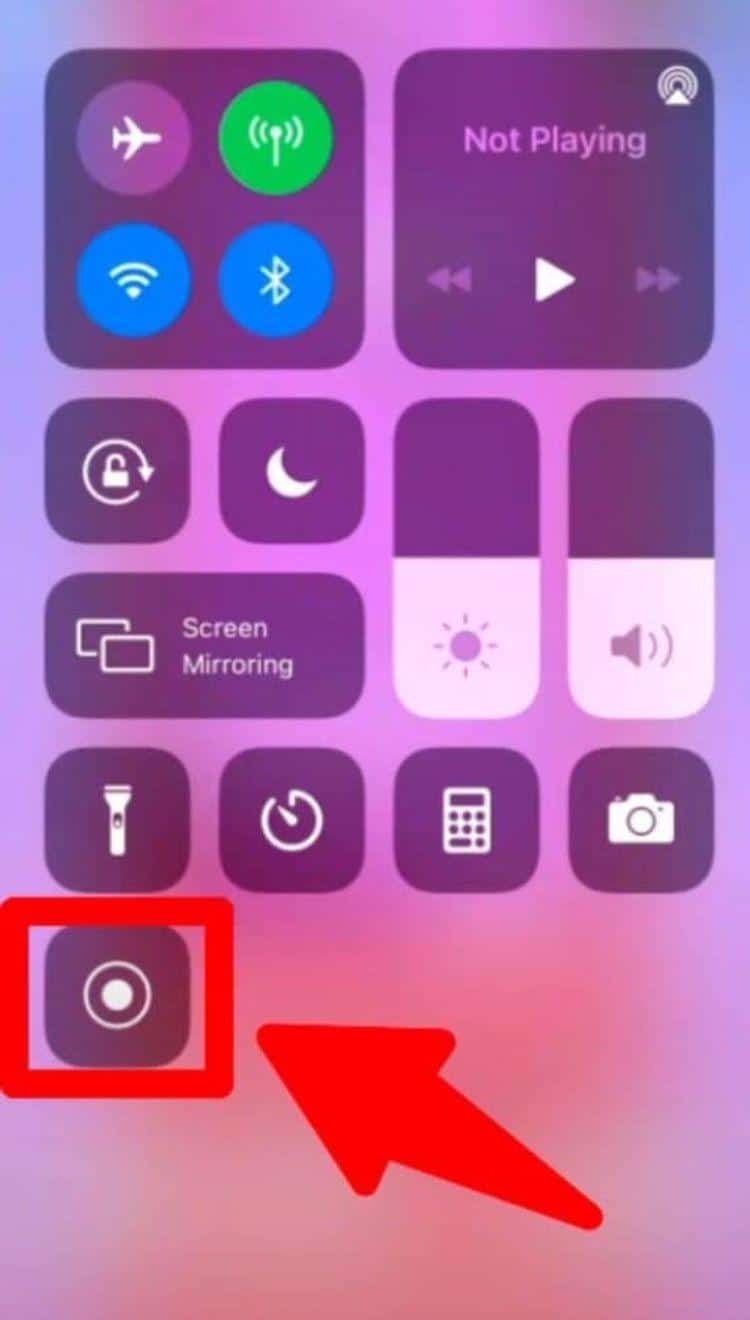
Here’s how to start a screen recording on your iPhone or iPad:
- Open your settings.
- Choose control center
- Select “Insert Screen Recording”
- Open Control Center
- Choose “Screen Recording”
- You’ll get an on-screen countdown.
Finally, when it’s time to stop the recording:
- Open the Control Center
- Tap the Screen Recording button
- Choose Stop
How To Record Your Screen During A Webinar On Your Android Phone
Using your mobile device’s built-in Android screen recording tool to record online meetings or events is pretty simple.
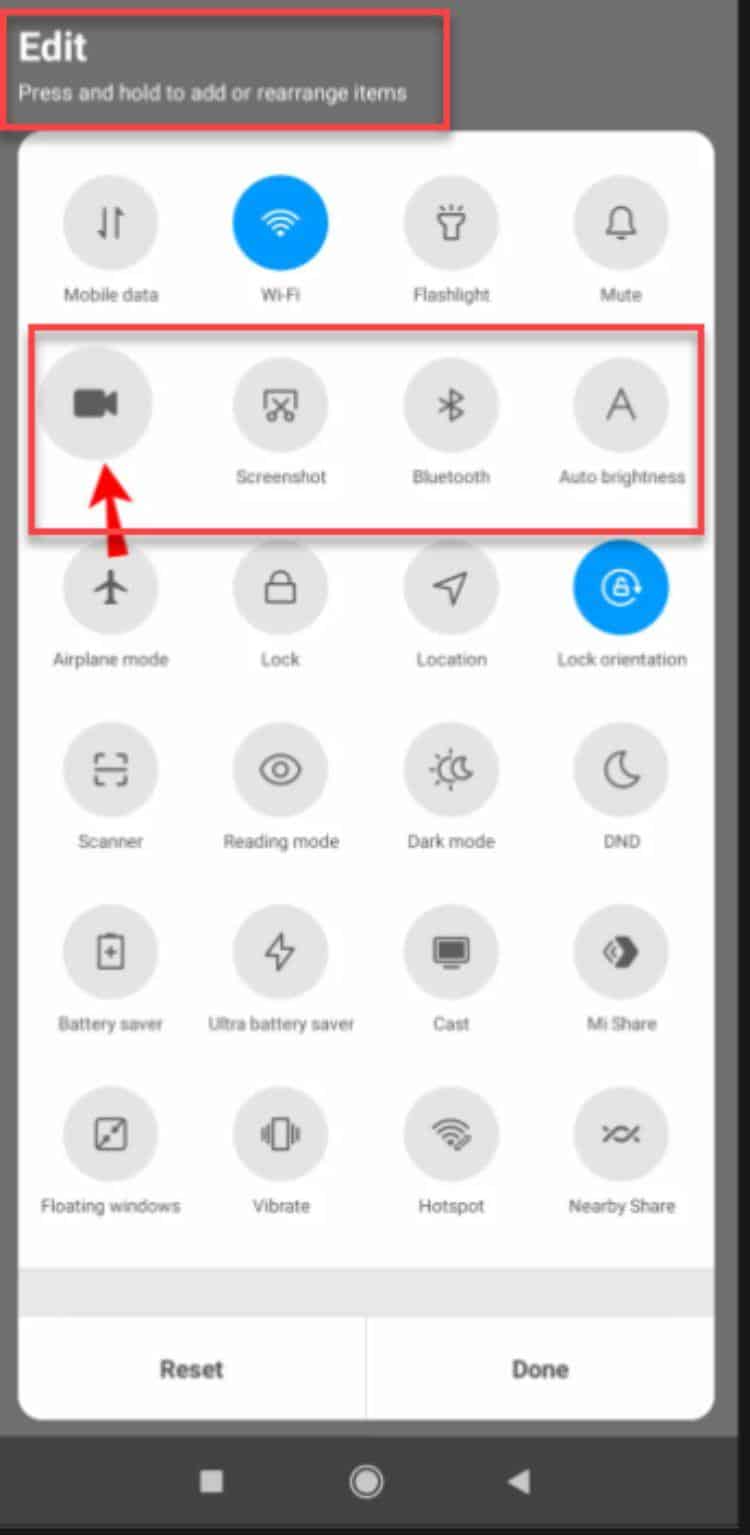
Here’s how to do it:
- First, bring down the notifications panel by dragging it down from the top of your screen.
- Then, tap the Screen Record icon.
- If you don’t see this icon, tap the Edit button and drag the Screen Record icon into your Quick Settings tiles.
- You’ll see a countdown before your screen recording begins.
- To stop recording, pull down the notification panel and tap Stop.
- The Gallery app will save your screen recording.
Using Third Party Screencasting And Screen Recording Software
There are various screencasting and screen recording software that you can use to record your webinars.
Some of the best ones include:
- Loom
- Screencast O Matic
- Camtasia
With these tools’ various features, you should have no trouble choosing the most suitable one for your needs.
Why Should You Record Webinars?
While webinar hosts enable recording on their end, not all do.
With that in mind, recording webinars has several benefits, which include the following.
You Can Share The Recordings With Others Who Might Find Them Relevant
When you screen capture a webinar, you generate a video you can share with others who might find it helpful.
For example, if you’re a business owner, share recordings of webinars on topics such as marketing or finance with your employees.
Or, if you’re a teacher, share recordings of webinars on teaching methods with your colleagues.
When you have a local recording of the computer, sharing the MP4 file with others is much easier than sharing a live webinar link since people will be able to watch the webinar at a time that suits them.
You Can Reference It At A Later Date
Recording a webinar also allows you to reference the content at a later date.
You can watch the recording again to remind yourself of what you or the moderator covered in the webinar, which is excellent for those webinars you must repeatedly return to.
You Can Transcribe It
Some hosts go fast on webinars or might say something you want to remember later.
Use a screen recorder to get the webinar recording and transcribe the audio later.
When you stop recording, extract and upload the audio file to a service like Otter.ai.
You can then get a transcript of what you or the moderator said in the webinar.
If, for example, you want to create blog posts or articles based on the webinar’s content, the process is much easier, and this can be useful.
Creating a tutorial or template that follows the webcast’s content is also great.
You Can Edit Out The Downtime
When you screen capture a webinar, you can edit any downtime, such as when the host takes water breaks, experiences technical problems, or goes back and forth while finding the correct slide.
You can create a more concise recording that gets straight to the point.
If you are recording your webinar before putting it live, eliminate any imperfections you find, allowing you to publish a more polished product.
Recording A Webinar Vs. Taking Screenshots
If you are recording someone else’s webinar, consider that recording a webinar is not the only way to save information.
Take screenshots of the slides during the webinar, which can be helpful if you want to refer back to specific parts of the presentation.
Also, combine webinar recordings and screenshots to get the best of both worlds.
Considering Webinar Platforms
If you are hosting a webinar and want to allow participants to record your webinar, you can decide to make their life easier with a few considerations.
Various webinar platforms now offer in-built recording features that make it easy to record the webinar and send the replay link to participants.
High-quality, real-time recordings are also essential if you use your webinar content to generate leads or convert prospects into sales using your webinars.
That said, live streaming takes up a lot of bandwidth, affecting the quality of your recording.
The last thing you want is your webinar recording to be choppy and have low-quality audio and video.
Researching the recording quality is essential before choosing a webinar platform.
In addition, some webinar recording software might charge extra for the recording feature, so look at the pricing plans (and what the pricing plan covers) before deciding on a platform.
Running A Practice Session to Check Quality
Most people only realize that they need a practice session after things go wrong during the main webinar.
It is essential to check all aspects of your setup, from sound levels to camera angles.
To ensure quality, set up a practice run with your attendees or participants before you begin the main webinar.
This will help you identify potential issues and make necessary improvements for the final recording.
Setting Up Your Recording
Once you’re done with the practice session and have identified any areas of improvement, it’s time to start setting up your recording equipment.
Depending on the type of webinar you are hosting, this could mean using professional-grade equipment such as high-end microphones and cameras or simply plugging in virtual devices like a laptop and headset.
Ensure you connect all your devices correctly and that the sound levels are adequate for a good recording.
Ensuring no technical issues or glitches during the recording process is also essential.
Recording The Webinar
When everything has been set up, you can start recording the webinar.
Depending on your setup, this could mean manually pressing the record or having an automated system.
If there is any confusion regarding properly capturing the webinar content, it’s best to consult with a professional or read up on the appropriate online guides.
You can familiarize yourself with various techniques, such as audio-mixing and video-editing software.
Some software also has a “pause recording” feature which allows you to pause the recording if the speaker is going off on a tangent.
As a feature, this is especially useful when recording extended interviews or speeches.
Saving and Sharing The Recording
Once the webinar has been recorded, you need to save it in a format that is easy to access and share.
Popular formats include MP4, AVI, and WMV.
Depending on your setup, you may also be able to record directly into the cloud for easy access.
Finally, you can start sharing the recording with your attendees or participants when everything has been saved.
This can be done through various channels, such as email links or direct downloads from websites like Dropbox or Google Drive.
Wrap Up.
A webinar video you can access anytime is precious, regardless of whether you’re the host or an attendee.
A recorded webinar allows you to go back and reference the content, share it with others, or create future content based on the topics covered.
While some webinar platforms have built-in recording features, not all do.
If they don’t (or the platform has disabled the feature), use paid or free webinar recording software, or even the screen capture software on your computer, phone, or tablet, to record your webinar.
If you do, always ensure you do not record copyrighted material or what the register has asked you not.
It can lead to legal problems.
Is it essential to be able to record a webinar?
What’s your favorite screen capture software?
Let me know in the comments below.
Further reading on AdamEnfroy.com: Besides webinar tools, video conferencing tools help businesses communicate with employees and customers worldwide.
There are also virtual conference platforms that help companies host significant events virtually.
Therefore, a company has no communication barrier, whether employees are in different countries or time zones.
Finally, if you want to learn more about specific webinar platforms, here are some further articles to check out:
Last Updated on May 6, 2024 by Adam Enfroy