Thinkific vs. Podia: Which Course Creation Tool is Best in 2024?
One of the best ways to monetize your business and create passive income is by selling courses.
Not only can you sell courses from your website, but you can also establish your authority in your industry, build a strong relationship with your students, and get paid to do what you love!
But to get started, you need the right online course platform.
Valued at $240 billion by 2022, this industry is rapidly growing and changing.
In this post, I’ll review in detail two of the best course creation platforms on the market today: Thinkific and Podia.
I’ll go over all the features that platforms offer including their course builders, membership site platform, and more – so you can decide which platform is the best fit for your business.
Let’s get started!
Thinkific vs. Podia Overview.
Here’s a quick overview of both platforms.
Thinkific
Thinkific is an all-in-one solution to create, market, and sell your online courses.
You can easily create courses using their intuitive course builder, import existing content, or upload your own.

Thinkific takes care of everything – hosting and delivering your e-learning course content to your students, processing payments, collecting tax information, and providing support.
You don’t have to worry about the technical details – just focus on creating amazing content for your students.
You can also create multiple courses and manage them from one place.
With Thinkific’s flexibility, you don’t have to worry about what format your course will take – choose from text lessons with images/videos/documents (which can be imported), quizzes to test student knowledge, and certificates to award upon completion.
It also integrates with significant marketing tools like Zapier, Keap (Infusionsoft), Shopify, Zoom, ActiveCampaign,
Here are some key features:
- User-friendly course builder which requires zero coding or technical know-how.
- Fully customizable and ready-to-use design templates and themes.
- Drag-and-drop course editor.
- Preview before publishing.
- Complete control over the marketing and selling of the course.
- Integration with other marketing tools.
- Data analytics at your fingertips.
- 24/7 support.
- Thinkific Academy courses for first-time creators.
- Networking and learning.
Podia
Podia is also an all-in-one platform where you can create and sell online courses, digital downloads, and set up membership sites without worrying about the tech.
You can upload videos, PDFs, audio files, or any type of content to your website.
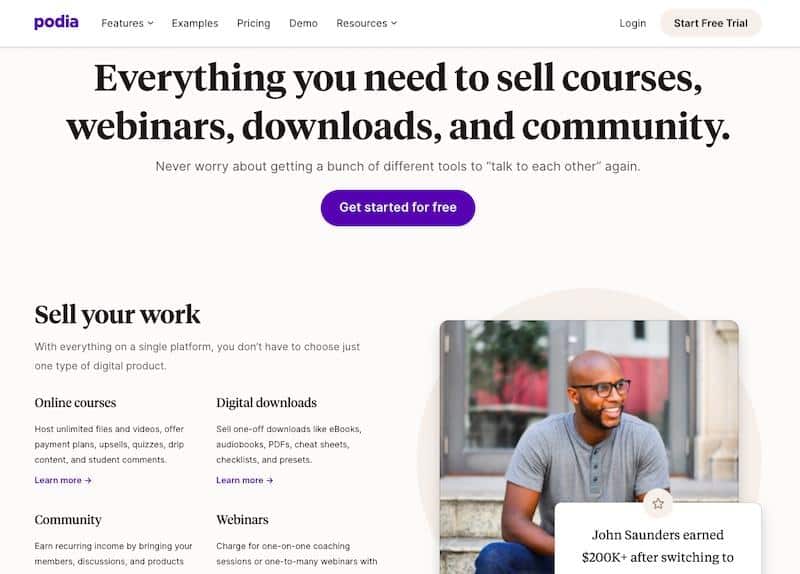
Podia also provides extensive integration with third-party email tools like MailChimp, Convertkit, and AWeber; payment gateways like PayPal and Stripe; Analytics tools like Hotjar and Google Analytics.
You can also connect it with Zapier for more integration options.
Some of Podia’s key features include:
- Variety of online courses to choose from.
- Creation and selling of digital products.
- Build communities with various levels of membership.
- Host webinars with unlimited participants.
- Email marketing functionality.
- Analytics and reporting.
- On-page live chat.
- Mobile-friendly custom websites.
- Create and manage using the affiliate program.
- Embedded product listing.
In a nutshell, Podia is an all-in-one platform for selling online courses and digital downloads and memberships for your content.
It’s also an excellent option for selling content like coaching, events, and even acts as a webinar platform, allowing you to host and run your own webinars on the platform.
Thinkific is a learning management system (LMS) that helps you create, market, sell, and deliver your online courses.
Here’s a detailed comparison of Thinkific and Podia.
Thinkific and Podia Key Features.
1. Course Builder.
Thinkific:
The Thinkific course builder is where you create lessons, add content, and configure your course settings.
The editor allows you to create and edit content for a lesson in your course.
You can use it to add text, images, videos, quizzes, and more.
You can sign up with your first name, last name, email ID, and password.
Thinkific will not let you sign in using your Google account directly.
The sign-up process also takes you through some additional steps, where you need to answer a few questions.
After signing up, you can access course-related items from the Thinkific menu on the left of the dashboard, or directly click on the “New Course” button if you want to create or add a new course.
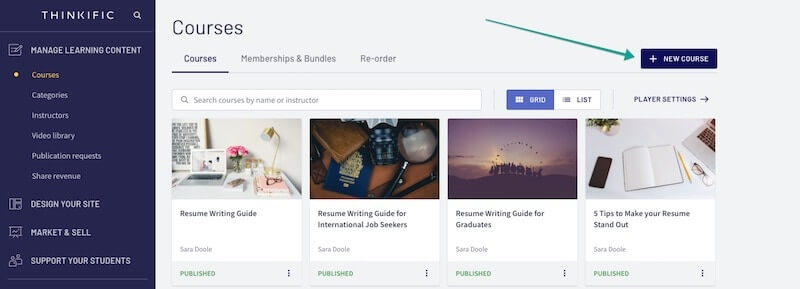
Image: Thinkific Dashboard; Source: Thinkific
You can pick from different types of templates to get started, such as:
- Blank Course (where you’ll build your course from scratch)
- Flagship Course
- Pre-Sell Course
- Mini-Course
- Webinar Replay
All templates are customizable and come with different guidelines and goals.
You can add, edit, and delete as many chapters to these templates.
Organizing your course content with chapters allows you to separate content into different sections.
Here’s an example of the Mini-Course template that helps you build a low-cost course suitable for building an initial audience.
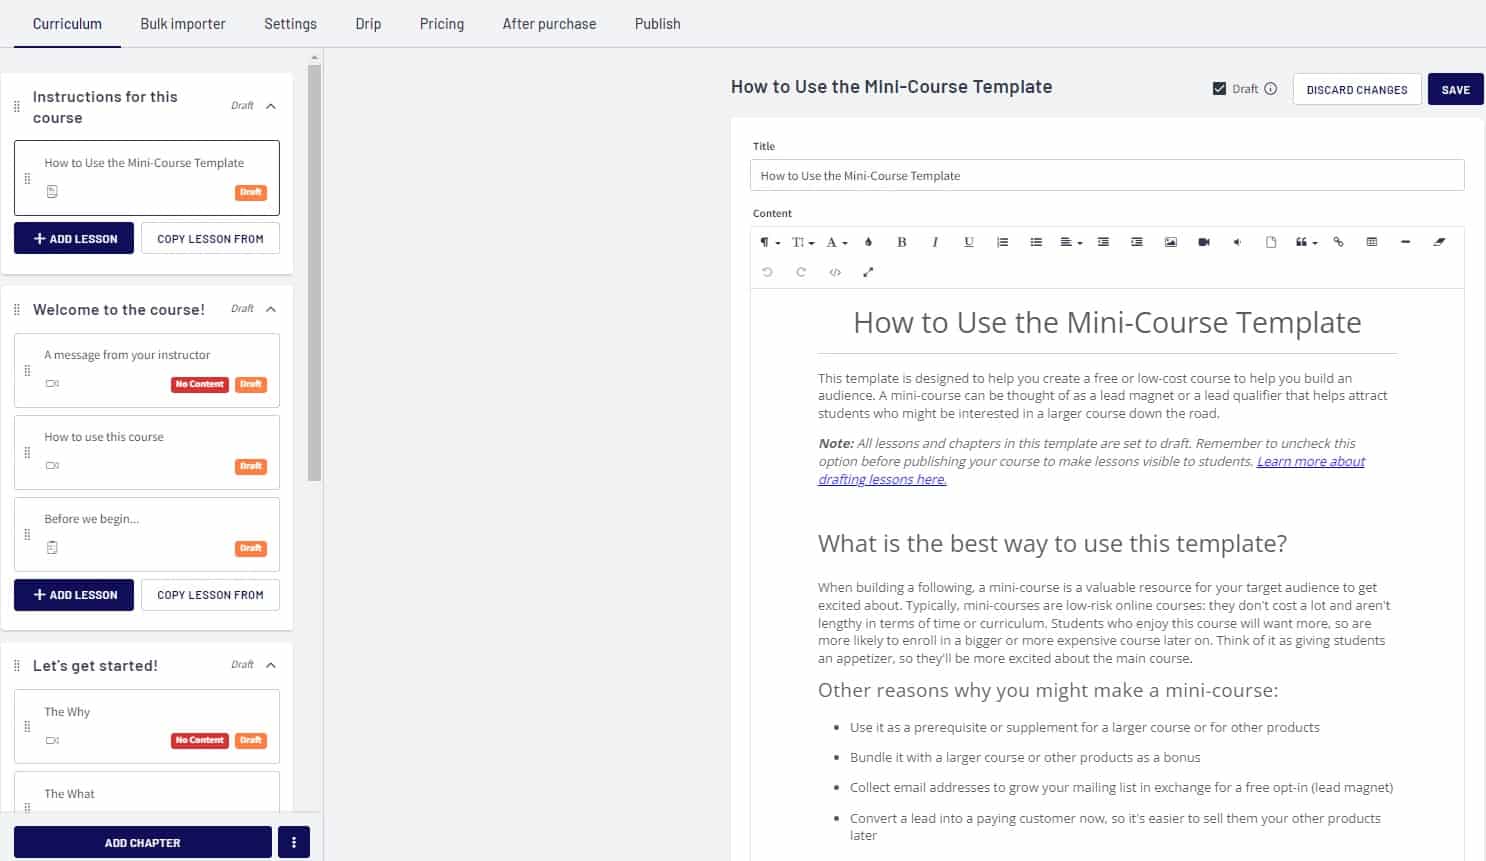
Thinkific Mini-Course template
It can work as a lead qualifier to encourage customers or students to enroll in a comprehensive course.
Next, you can add content to the course in two ways:
- Either add chapters one-by-one
- Or use a bulk importer to upload all of your content at once.
To add one chapter at a time, go to the Curriculum tab on the top-left corner, and select Add Chapter.

Image: Add new chapter; Source: Thinkific
Chapters further get divided into lessons that contain media, such as text, video, audio, PDFs, presentations, and more.
You can also add quizzes, assignments, surveys, and exams to assess your students.
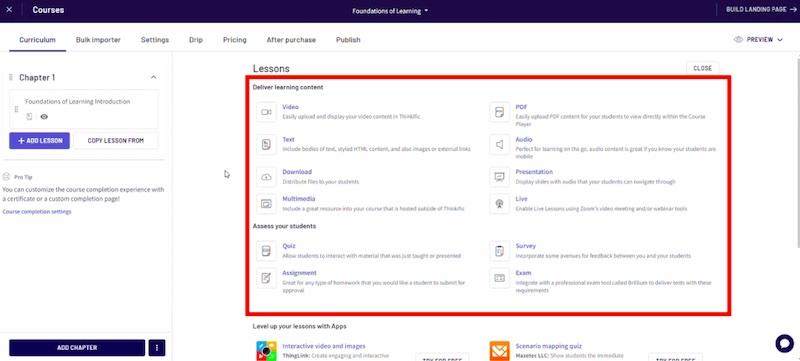
Image: Types of lessons; Source: Thinkific
You can preview this lesson and set it to be available for free.
You can also enable discussion on this and other lessons, make your media downloadable from within the course, and add tags or keywords to help people find your content.
You can also change your course’s name, add the course URL, choose the instructor, and set access permissions from the Course Setting tab.
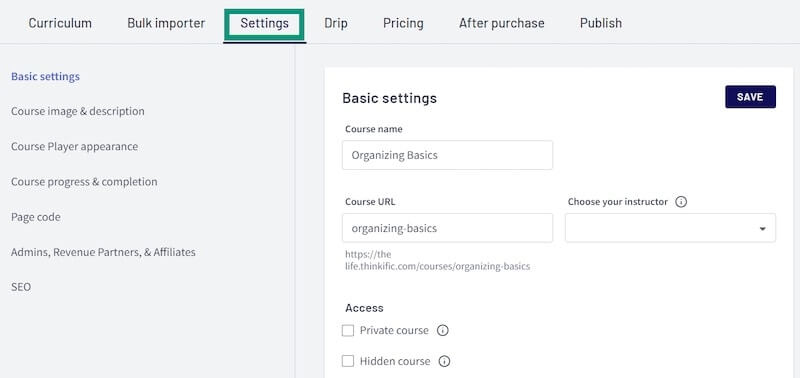
Image: Course settings; Source: Thinkific
Sometimes you don’t want to give away all your best content right away.
In that case, you can set up your course so that students unlock new content over time (i.e., drip content).
You can use the drip course schedule to control when your subscribers can access the course material, including:
- Student Enrollment Date
- Student Course Start Date
- Specific Date
For instance, you will have full access to lesson 1 from the day you enroll.
Then, you’ll be able to access the next chapter one week after registering and the subsequent chapters seven days after each previous chapter.
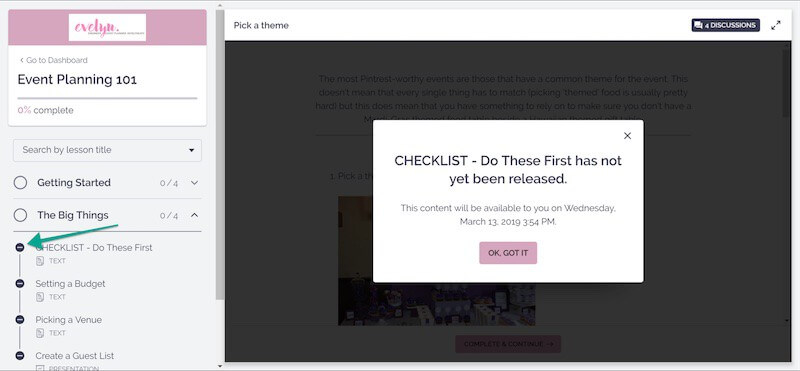
Image: Drip schedule; Source: Thinkific
You can choose to make your course available for a one-time payment, a recurring subscription, a monthly payment plan, or even for free.
You can also decide where students land after they purchase your course.
Podia:
Signing up for a Podia account takes seconds – just enter your name, email address, and password, and you’re ready to create your course.
You have a free 14-day trial period before becoming a paid member.

Image: Podia Sign-up; Source: Podia
With Podia, you can choose from a variety of online courses.
You can create:
- Standalone courses
- Drip courses
- Bundles of Courses
- Pre-sell courses
- Pre-launch courses.
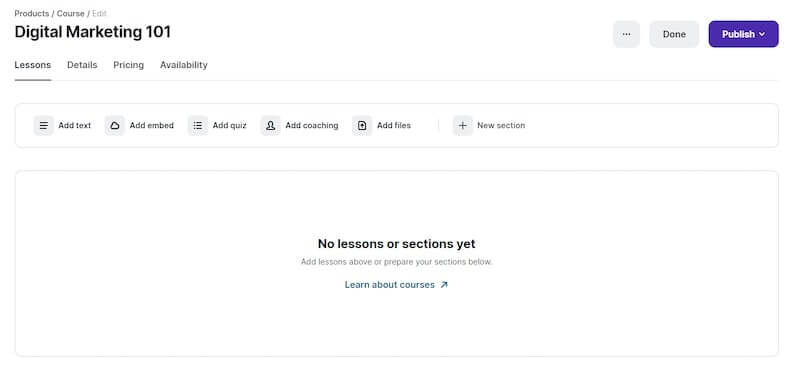
Image: Adding course in Podia; Source: Podia
The next step is to add content to your online course. Podia allows you to add text, links, quizzes, or upload files.
In your lessons, you can also embed YouTube videos, Vimeo videos, Soundslice, Google Docs, Instagram, and more.
For pricing, you can set a custom course free, offer recurring payments, and upsell with other products during the checkout.
Podia also lets you select the availability.
For example, you can pre-sell, make your course available for purchase right away, or hide it until it starts, so all of your participants begin simultaneously.
Winner: Thinkific.
Podia’s course builder is easier to use and more straightforward than Thinkific.
However, Thinkific offers more features and flexibility to the course creators.
2. Membership Sites.
Both Thinkific and Podia let you create a membership site.
Membership sites are password-protected portals on your website where members pay a monthly or annual subscription fee to access exclusive content or services.
Let’s see how they compare.
Thinkific:
Your Thinkific membership site lets learners access your course content whenever they want.
To create membership sites with Thinkific, you can start by creating a Bundle first.
Bundles allow you to put together multiple courses and sell them as one package.
Go to the Courses tab, click on Memberships & Bundles, and select +New Bundle.
Enter a name for your Bundle and click Create.
Click on the + sign next to Member Courses and select all the courses you want to offer in this bundle.
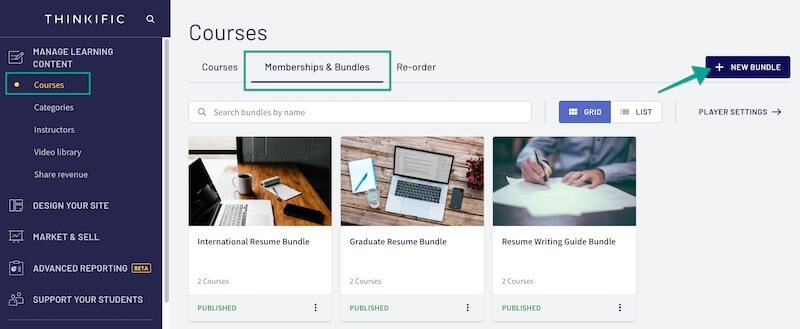
Image: Course Bundle; Source: Thinkific Help Center
Next, you can give members different access rights to your content, depending on the level of membership they purchase.
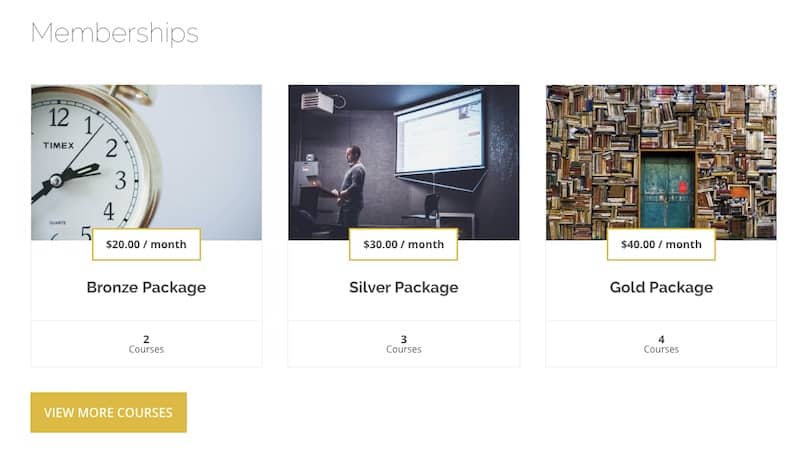
Image: Subscription Pricing Tiers; Source: Thinkific Help Center
Set your price once that’s done, and you’re good to go.
You can set up multiple membership levels and subscription plans, so users have different options for signing up.
You can also set up trial periods or charge users on a one-time or recurring basis.
You can allow members to make payments either in a lump sum or with one-time, one-off, or recurring payments via Stripe.
In addition, the bundle landing page also gives you the option to insert custom code and SEO information.
Podia:
Like Thinkific, Podia also allows you to create different levels of Membership plans and Course Bundles.
You can create different topic pages for your members to join, pin important announcements, and schedule your posts in advance.
You can also keep your course access:
- Open, where all community members can view or follow a topic.
- Private, where you can find specific members who can view or follow a subject.
- Public, where all members can view and follow a particular topic.
As for the pricing, Podia also lets you offer different pricing tiers, including recurring monthly or yearly payments and a free trial.
Other features include:
- Features like upsells and coupons to encourage more subscriptions.
- Connect your membership site to your Facebook Group, Slack Channel, or Palapa community.
- Send email notifications when you create membership posts.
Winner: It’s a Draw.
3. Marketing and Sales Features.
Both Thinkific and Podia offer similar tools, including coupons, discounts, drip emails, and extensive third-party integrations with digital marketing tools.
Let’s see how they compare.
Thinkific:
Thinkific comes with various marketing and sales tools, including built-in SEO capabilities, landing pages, upsells, coupon codes, and more to help you market more effectively.
You can collect leads by allowing visitors to sign up for free and paid courses on your site, for starters. It allows you to set up different pricing tiers to attract different customers.
Then you have features like coupons and promotions to encourage customers to purchase.
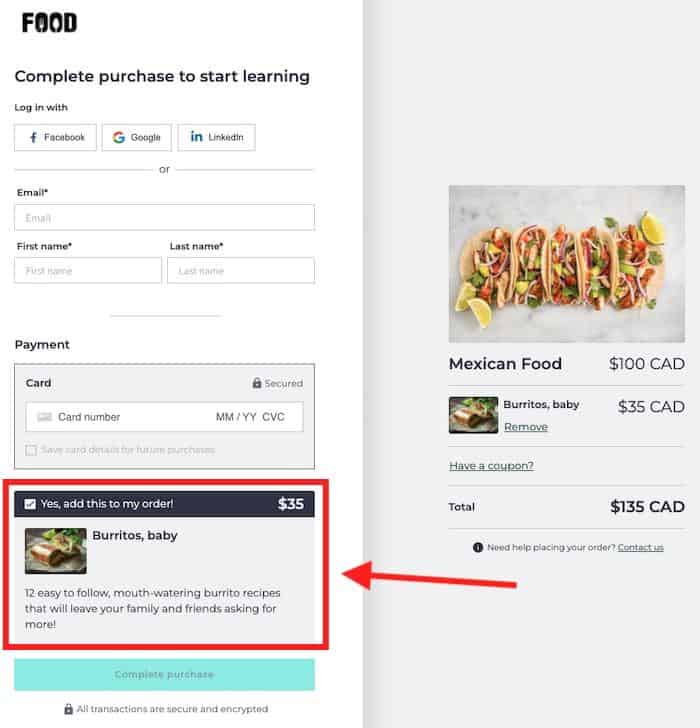
You can also add order bumps to your existing successful courses to increase your sales volume.
An order bump is an additional product or service that a student can add to their purchase of a course, bundle, or membership.
Thinkific lets you present this as an optional add-on to your storefront during the checkout process.
If a student selects the order bump, you will charge them for it when they complete the purchase of their course.
Integration with third-party email marketing platforms like ActiveCampaign and CRM tools also helps you:
- Create branded marketing emails.
- Send tailored emails based on users’ actions.
- Automate the process of adding and updating contacts.
Thanks to Thinkific’s social sharing features, you can also share your Thinkific content on Facebook, LinkedIn, and Twitter without ever leaving the platform.
You’ll get a preview of what your post will look like, and add any details you want before sharing.

Image: Social Sharing; Source: Thinkific
Thinkific also lets you add QR codes to your courses and marketing materials, making it easy for users to access the information you want them to see.
Here’s how you can use Thinkific’s QR code for marketing your courses:
- It makes it easier for customers to find your site and course landing page.
- Print the QR code on your printed materials so that clients can transition easily from offline to online information.
- Add a promotion code to the QR code and give everybody who scans it a discount on your product or service.
- Give your customers a free preview of your course by attaching a QR code to the information they want.
Next, Thinkific’s pre-order feature allows users to pre-sell their course before it’s ready to publish.
It will enable you to sell more courses, increase sales velocity, and generate more revenue.
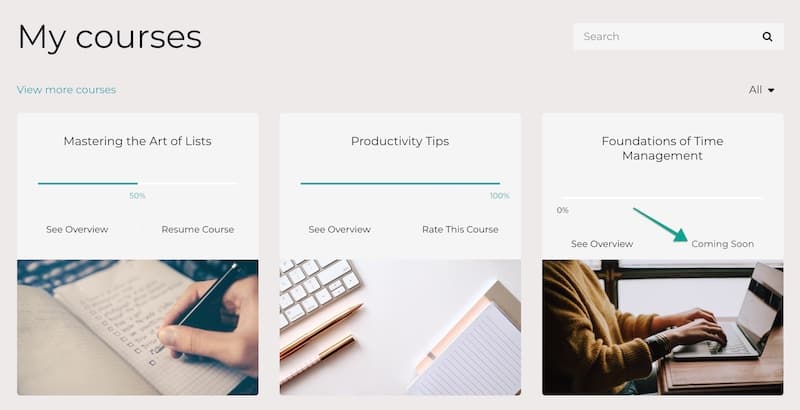
Image: Pre-sell; Source: Thinkific
It will also help you in:
- Analyzing whether there’s a market for your course.
- Raising money to cut down your starting costs.
- Getting initial feedback.
With Thinkific, you also get access to a built-in payment gateway with no transaction fees and the ability to accept payments in over 100 countries.
Podia:
Podia comes with plenty of features you need to manage your online business: a checkout system, an affiliate marketing system, and a built-in email marketing tool.
You can also market your course via membership sites, webinars, and digital products.
You can use Podia’s email marketing feature to send either a broadcast email to your entire audience (customers and subscribers) or an automated email sequence to customers only.
Or you can segment your audience by the products they purchase to send targeted emails.
You’ll also be able to get a quick overview of Podia analytics along with detailed metrics like:
- Recipient activity
- Sales
- Open rate
- Click-through rate
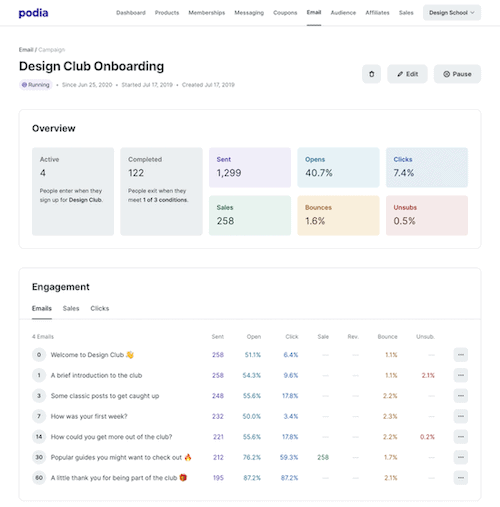
Image: Podia email marketing dashboard; Source: Podia
When someone downloads a free downloadable product, you can also use a drip-email campaign to guide that person down the sales funnel to your paid products.
Since the email marketing features are built right into Podia’s dashboard, you don’t need a third-party tool.
However, you can integrate it with third-party apps for more advanced features.
You can even embed email registration forms to your Podia site to grow your email list.
Podia also comes with an affiliate marketing program built right in.
This program makes it easy to set up affiliate partners, view their stats, and pay their commissions.
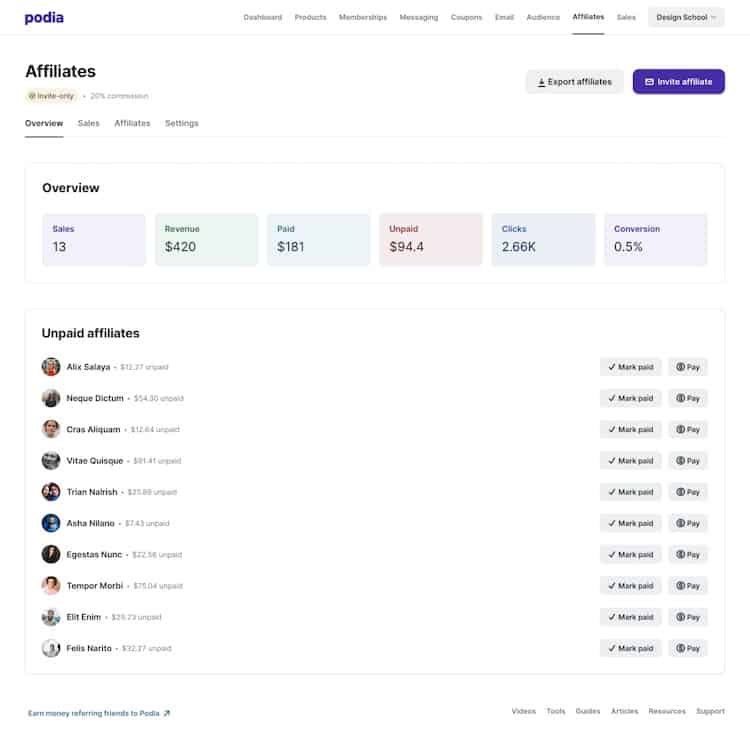
Image: Podia Affiliate Marketing; Source: Podia
Podia also has a built-in messaging tool that lets you engage prospects and establish customer connections.
You can use it without any additional cost.
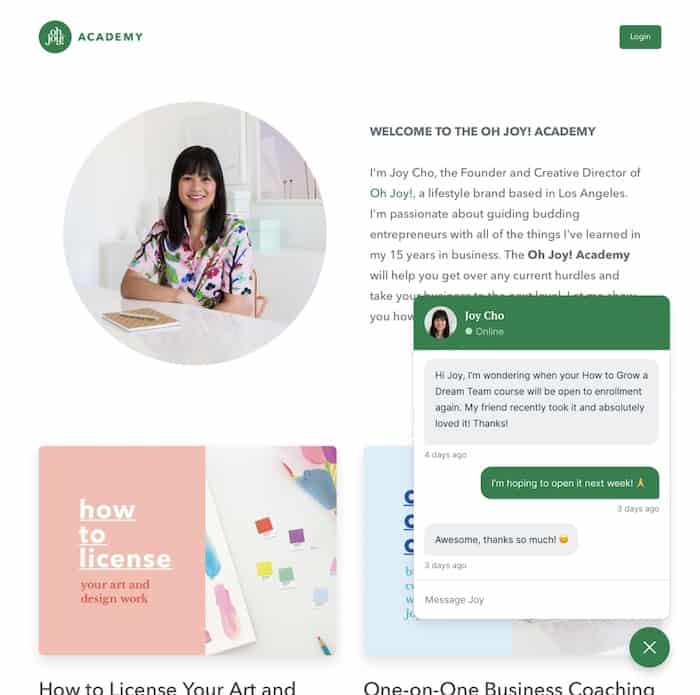
Image: Podia’s messaging tool; Source: Podia
With the Embed feature, you can sell digital products on the web from your website.
Podia lets you add product cards, buy buttons, or text links on your website or sales page.
Winner: Podia.
Although Thinkific and Podia offer extensive marketing and sales features, Podia is the clear winner here.
Its built-in email marketing tool and affiliate system are hard to beat.
4. Selling Digital Products.
Digital products are a great way to start selling your products because you don’t have to worry about shipping costs or dealing with physical products.
Both Thinkific and Podia make it easy for you to create and sell digital products, but which one is better?
Let’s find out.
Thinkific:
Thinkific lets you insert select file types in your course to offer them as downloadable lessons.
This makes it easy for you to give your students supplemental content, like worksheets, video tutorials, exams, and more.
Note that Thinkific doesn’t support selling products separately.
You’ll have to add them as downloadable products within the course or offer them as an upsell during the checkout.
Here is how you can create a downloadable digital product within the course:
In the left sidebar of your admin dashboard, you’ll see a link for Manage Learning Content. From there, choose Course, then choose the course for which you want to add your digital product.
Next, select the three dots on the course card, and click on the “Edit” option.
After that, select “Add Content” from the Curriculum tab and select “Downloads.”
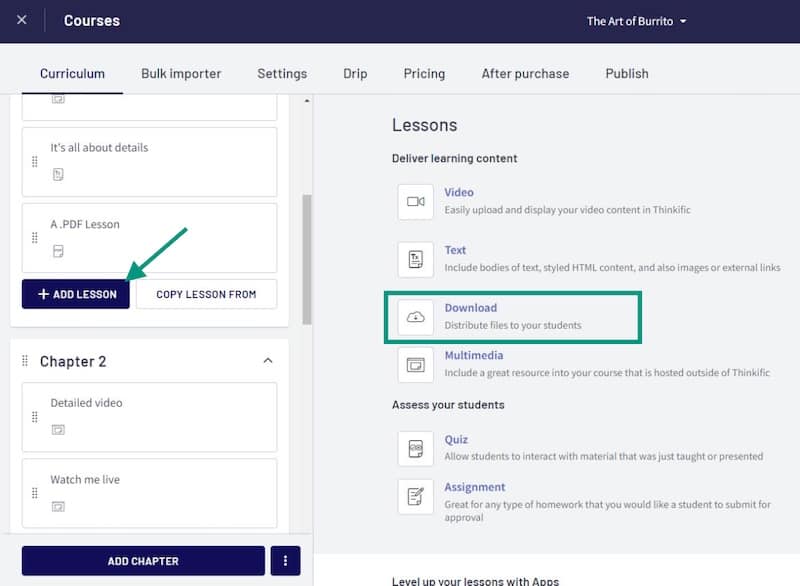
Image: Adding Digital Downloads; Source: Thinkific Help Center
Next, you will want to give your product a title and upload your file, which you can do by either dragging the file into the box or clicking the “Select Files” button in the window.
There is no limit on the number of files you can upload and the types of files accepted.
Once uploading is complete, click on Save, and your downloadable lesson will be ready.
Once you publish it, students can simply right-click on the file to save it to their devices.
Podia:
You can use Podia to create and sell digital products like ebooks, audiobooks, PDFs, checklists, preset collections, etc.
Here is how you can create one yourself:
From your dashboard, click Products, and then + Create Product.
You’ll get to choose between different types of products. Select Digital Download.
This will direct you to a window where you can upload files you want to offer as Digital Download.
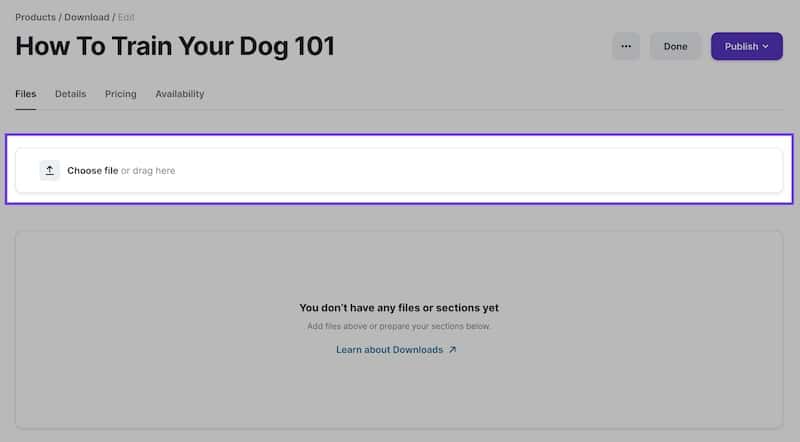
Image: Add digital downloads; Source: Podia Help Center
Use the file uploader button to choose files or drag and drop your files here.
After uploading, you’ll see four different tabs on your window: Files, Details, Pricing, and Availability.
These tabs let you modify your digital product’s properties as follows:
- Files: Here, you can upload and manage all your digital files.
- Details: You can set details such as your digital product’s name, URL, categories, and social media image!
- Pricing: You can set up the price of your download.
- Available: You can control your digital product’s visibility and when to start its sales.
When you’re ready, click Publish, and your Digital Product will be live.
While both platforms let you add digital products, Podia allows you to create standalone digital products and sell them individually.
On the other hand, Thinkific will only let you market and sell digital downloads with courses.
5. Student Experience and Engagement.
Are your students engaged?
Are they watching videos, completing quizzes, and interacting with you and other students?
If not, engagement is something that you can improve.
Fortunately, both Thinkific and Podia have student engagement features.
Here’s a detailed comparison.
Thinkific:
You can start by creating a business website or standalone checkout pages with Thinkific to engage your students.
A student must enroll in the course to start using the course content.
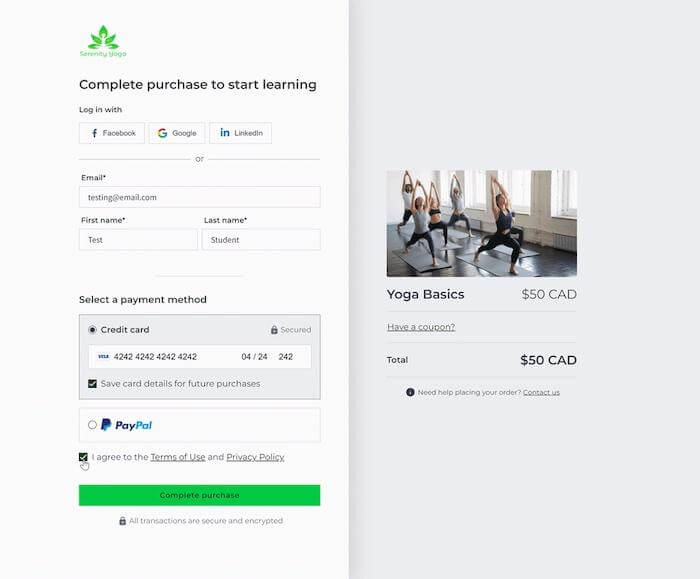
Image: Student Account Sign Up and Checkout; Source: Thinkific Help Center
When students register, the form asks for their name, email address, payment details, and the like.
Students can also create an account without purchasing any courses.
Once students purchase the course, they’ll get directed to a Thank You page.
Or, if you want to customize this flow, you can do that in your Settings.
In addition, they’ll also receive the Thinkific Welcome Email and your Course Welcome Email.
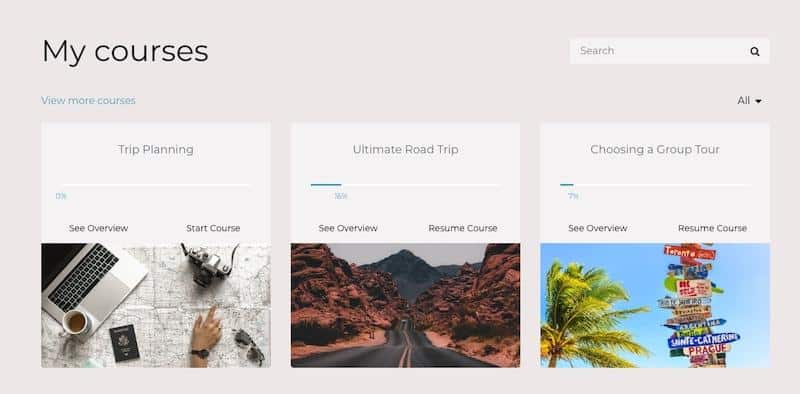
Image: The Student Dashboard; Source: Thinkific Help Center
Unless students purchase a drip-scheduled course, they will gain immediate access to the course options.
With Thinkific’s in-built Course Player, they can watch videos, take quizzes, and access other files.
Course Player is highly customizable; you can personalize its fonts, colors, themes, and logos.
Thinkific lets you create quizzes that your students can take after every lesson or video.
These quizzes help students remember what they’ve learned and reinforce essential concepts.
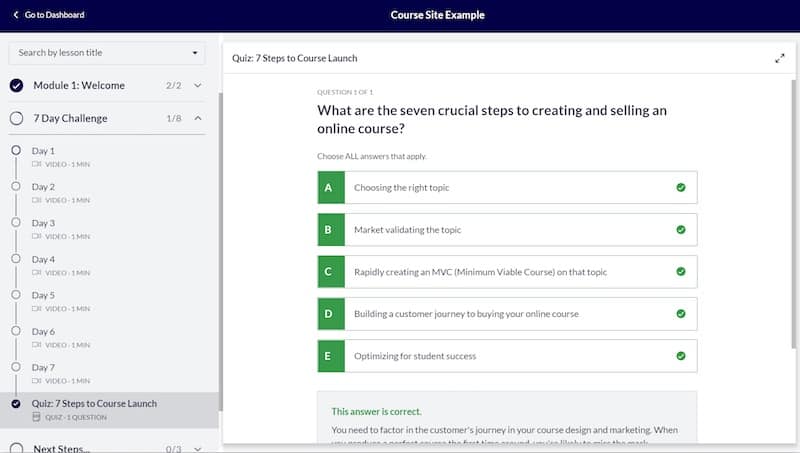
Image: Quiz; Source: Thinkific Help Center
After your students complete your quiz, you can check their results.
You can also check your students’ survey answers if you set up any surveys in your course.
To view the complete report, export your quiz and survey data to a CSV file by going to the Quiz & Survey section in your admin panel and selecting “Export.”
You can also customize your search results by Course Name and Completion Date.
You can also view your students’ profiles, including details like name, email ID, company, professional title, timezone, site language, etc.
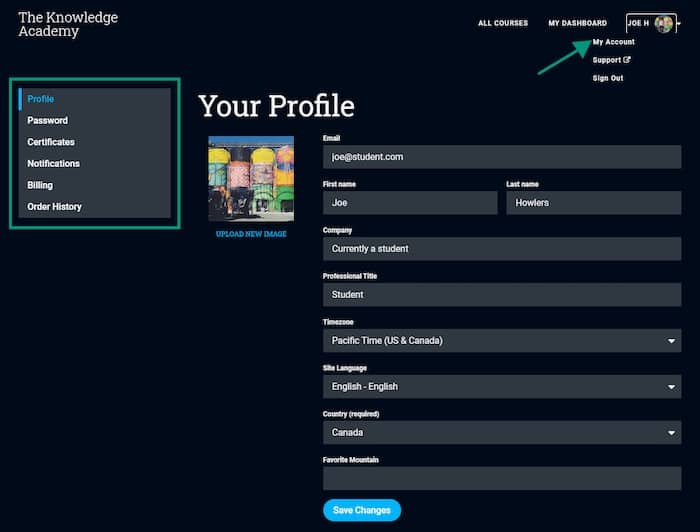
Image: Student Profile; Source: Thinkific Help Center
The menu on the top-left side of the page allows students to access their Certificates, course updates, billing details, past orders, etc.
They can also update their password from this section.
Other student assessment features include:
- Student Progress – After completing a unit, students will click “Complete & Continue” to gain access to the next unit on the course. Students can also see their progress within the course by clicking the Progress Report button.
- Activity Feed – Thinkific provides an Activity Feed for every student, so you can see which chapters they’ve viewed and completed.
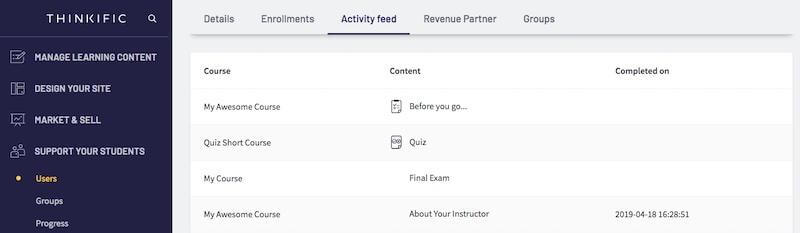
Image: Activity Feed; Source: Thinkific Help Center
- Sign-in Information – Get access to your students’ last sign-in dates, the total number of times they have signed in, etc.
In addition, you can get an overview of how students interact with your video lessons.
To view these statistics, go to Manage Learning Content > Video Library > Edit button next to your desired video, and then select Analytics.
Here, you will see the following metrics like:
- Average Engagement: How long the average viewer is watching your video?
- Total Plays: How many times has that video been viewed?
- Play Rate: Calculated by dividing the number of people who saw the video by the total number of people who loaded it on a website.
- Last Watched: The last time someone viewed the video?
You can also save these reports as a CSV file. You will receive an email with a link to your download.
Export comes with filters including Affiliates, Amount Spent, Course Admin, Email, Enrolled In, Enrollment Status, etc.
These give you immense flexibility when analyzing your data.
Podia:
Podia has a built-in community feature that allows you to interact and communicate with your audience in each lesson.
With community, members can do the following in one place:
- Purchase your products
- Consume your content
- Post and join discussions
There’s no need to log into a different platform to interact with other members or course creators.
Community lets you publish different posts, FAQs, and topics that your members can follow, comment on, and even post themselves based on the access level you allow.
Community privacy settings will help you restrict who can see and do what in your community.

You also get access to detailed community analytics.
You can see how many community members are part of your community, the total number of likes and comments on your community posts, the number of topics in the group, and more.
You can narrow down your results by using filters.
These include All Members (by default), Free Trials, Free Members, and Paid Members.
You can even sort this data by Members’ joining date or role.
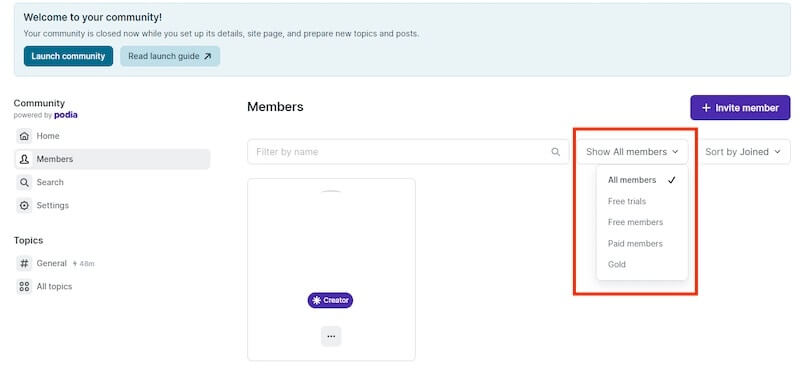
Image: Community Analytics; Source: Podia
The main dashboard also provides an overview of how your members interact with your products.
In addition, there are different sections for different student engagement analytics:
- The Community section shows the total number of posts and likes and comments on those posts.
- The Audience section provides insights about the total number of subscribers, customers who have purchased your products, and community members.
- The Sales section shows the total number of sales, total revenue, and monthly recurring revenue.
In addition, you can access email engagement metrics to see how your customers, subscribers, and members are engaging with your broadcasts and campaigns.
The report also offers an overview of your email interactions, such as the number of emails sent, opened, clicked, and bounced.
Plus, you can see the number of unsubscribes and sales from those emails.
Winner: Podia.
Thanks to its community feature and community moderation functionality, Podia is the winner here.
Podia vs Thinkific Pricing Plans.
Podia has three plans, available for $33, $75, and $166 per month.
Thinkific has three plans, priced at $39, $79, and $399 per month.
The fourth plan is a freemium plan.
Note that these prices are applicable if you sign up for 12 months at a time on both Podia and Thinkific.
Let’s dissect their pricing options in detail.
Thinkific Pricing Plans:
- Free Plan ($0) – Limited courses and unlimited students, one site admin account, drag and drop Course Builder, ecommerce features, website templates, email and phone support, Thinkific app store.
- Basic Plan ($39 per month) – Includes all Free features + unlimited courses, students, and content, live Chat support, custom domain, coupons and promotions, drip (scheduled) content, one-to-one student email, Thinkific Academy Basic Courses.
- Pro Plan ($79 per month) – Includes all Basic features + two site admin accounts, private and hidden courses, subscription and flexible pricing, course completion certificates, single communities, live lessons, etc.
- Premier Plan ($399 per month) – Includes all Pro features + five site admin accounts, unlimited communities, white labeling, API access, Brillium exams integration, etc.
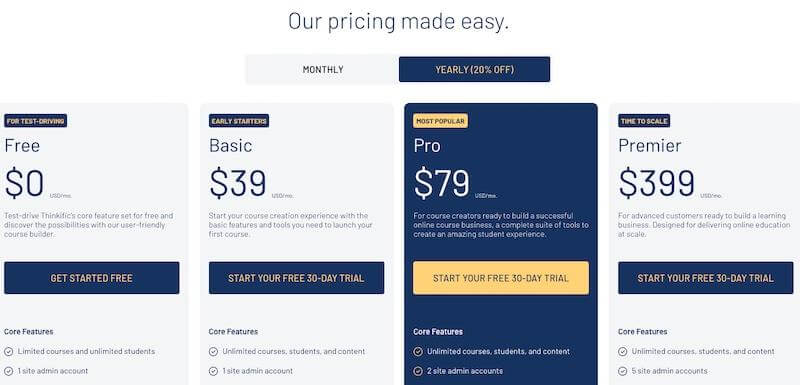
All paid plans come with a 30-day free trial.
Podia Pricing Plans:
- Mover Plan ($33 per month) – custom website, email marketing, customer messaging, community, unlimited courses, unlimited downloads, unlimited webinars.
- Shaker Plan ($75 per month) – Includes all Mover features + unlimited coaching products and affiliates.
- Earthquaker Plan ($166 per month) – Includes all Shaker features + priority customer support professionals to help as needed, onboarding calls, and monthly creator call.
All paid plans come with a 14-day free trial.
Executive Summary.
Choosing the best online course platform for your business is no easy feat.
Both Thinkific and Podia are course creation tools suitable for building a profitable online course.
Both have advanced customization options, minimal user interface, a site builder, and the ability to create unlimited courses, interactive classroom features, among other advanced tools.
If your number-one objective is just to sell courses and make money, then Thinkific seems suitable.
It also has a free plan for startups and beginners discovering the possibilities of a course builder.
For the general population, I think that Thinkific is the winner and the way to go.
On the other hand, Podia is more like an all-in-one tool with all the bells and whistles.
These include messaging tools, affiliate programs, and more, so if you’re looking for something more specific, then this platform might be one to check out.
Further reading on AdamEnfroy.com: Want to get even more in-depth with each of these platforms?
Check out both my detailed Thinkific review and Podia analysis for more information.
Want to see how other online course platforms compare to each other?
Then, check out my various comparison reviews below:
Last Updated on May 14, 2024 by Adam Enfroy