Teachable Review: Pricing, Features, and More for 2024
Over the past 5 years, online courses have evolved way beyond ebooks and basic videos.
Online courses have become full-fledged educational products that cover every industry imaginable. With online courses becoming more popular in general this has led to the rise of online course platforms, like Teachable, pushing innovation rapidly.
In this Teachable review post, I am going to take you through everything you need to know about the product.
Let’s get started.
Disclaimer: This article contains affiliate links where I may receive a small commission at no cost to you if you decide to purchase a paid plan. However, this is a tool I fully recommend when it comes to creating, launching, and hosting online courses. You can read my full affiliate disclosure in my privacy policy.
What is Teachable?
Teachable is an online course platform or Learning Management System (LMS) that helps teachers build subscription-based online courses. It allows you to publish content, build an audience, and teach your students with ease.Teachable is an online course platform or Learning Management System (LMS) that helps teachers build subscription-based online courses. It allows you to publish content, build an audience, and teach your students with ease.Teachable is an online course platform or Learning Management System (LMS) that helps teachers build subscription-based online courses. It allows you to publish content, build an audience, and teach your students with ease.
It’s a user-friendly platform that lets anyone create a course, whether you’re an expert, just getting started, or not yet an expert in your field. Teachable doesn’t require any HTML or CSS knowledge or even a website to teach.
If you can explain something in plain English, you can make a successful course on Teachable.
It manages every aspect of course building for you, including:
- Web hosting and video hosting.
- WordPress plugins.
- Accepting payments.
- Drip course content.
- Creating membership sites.
- Creating and hosting sales pages.
- Promoting your course.
- Engaging students. And more.
Owing to its features, the platform powers over 100,000 creators. All these creators from across the world use Teachable to share their knowledge with their students.
Is Teachable Suitable For All Online Course Creators?
Teachable is a suitable fit for small businesses and anyone creating a course for the first time since it’s affordable and easy to use. You won’t have to skim through too many advanced configuration settings and options.
It’s also great for professionals looking to develop their brand and audience.
While there are numerous other online course platform hosting options that have more advanced features (like Kajabi and Thinkific), Teachable is still an excellent option for beginners.
You’ll also get access to their 40-minute quickstart workshop right after signing up, contributing to its ease of use.
The workshop will help you in:
- Building your course with Teachable.
- Organizing your content, module by module.
- Structuring your pricing plans (precisely the way you want).
- Configuring payments and publish your services.
- Creating your sales page and other landing pages.
- Uploading and managing course content.
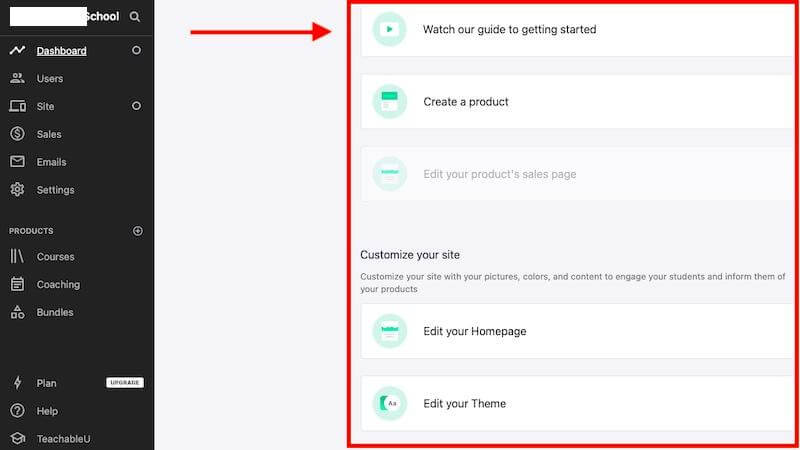
You can even create your products, edit your homepage, theme, and more right from your dashboard. What’s more, you’ll be able to do everything in a step-by-step process using in-app tips and smooth navigation.
Teachable Key Features.
Next in this Teachable review post, I want to take you through the key features you need to know about.
1. Easy to Use Course Builder.
Teachable is an excellent platform that allows you to create, edit, and publish online courses. Their drag and drop builder is intuitive and makes it easy for anyone to create courses.
To create your first course, head to the “Products” tab on your dashboard.
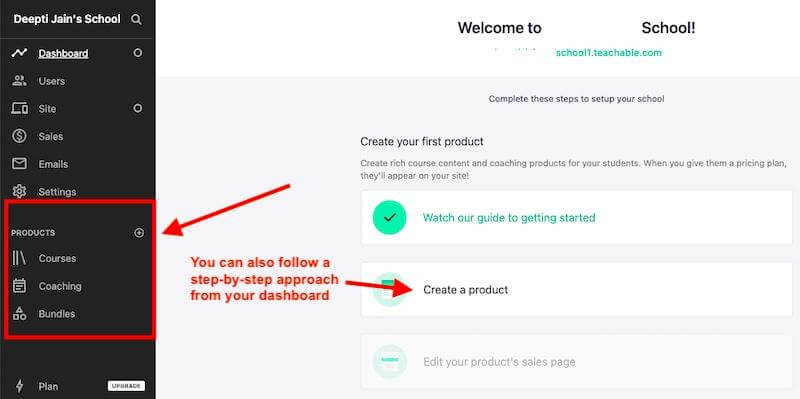
You’ll see three options there, namely:
- Courses – Build a curriculum for your students that can be self-paced or guided directly by you, the instructor.
- Coaching – With coaching, you can collaborate with your students through scheduled video calls.
- Bundles – Bundles let you package your coaching and course products together to sell to your students.
If you start with the “Courses” option, you’ll get prompted to add basic course information like course title and subtitle.

You can even pick a specific author for your course.
The ability to select an author for a course helps you collaborate with team members and assign specific roles and permissions. Teachable even supports the authors and helps you pay them and distribute the revenue share separately.
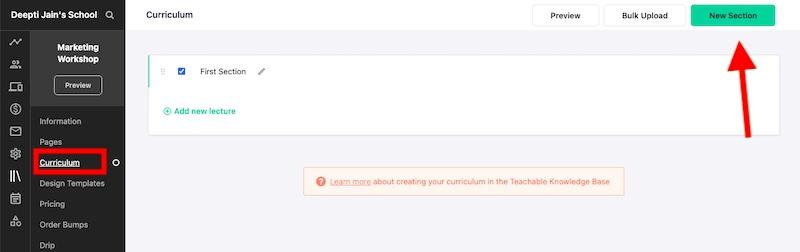
Next, hit the “Create Course” button, and you’ll get redirected to the “Curriculum” page.
The Curriculum page allows you to duplicate your course, add content to a new course, create lectures, and more.
You can start by creating a “New Section.”
Note that in Techabale, Sections contain groupings of lectures. And lectures are structured informational units of text, files, video, images, and quizzes.
You can add as many “Lectures” as you want in a single “Section.”
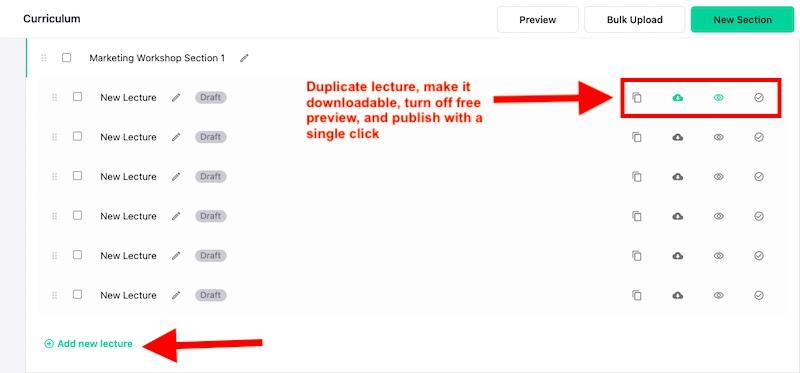
Here’s everything you can add to your lecture:
- Files – Use the file uploader to upload video, audio, PDFs, or any other files into your lecture.
- Text – Use the built-in text editor to format text in your lecture.
- Quiz – Use the built-in quiz creator to create a multiple choice quiz. Note that you can only have one quiz per lecture.
- Upsell – Add an upsell block to your lecture.
You can also add code examples or insert custom HTML, CSS and Javascript into your lecture.
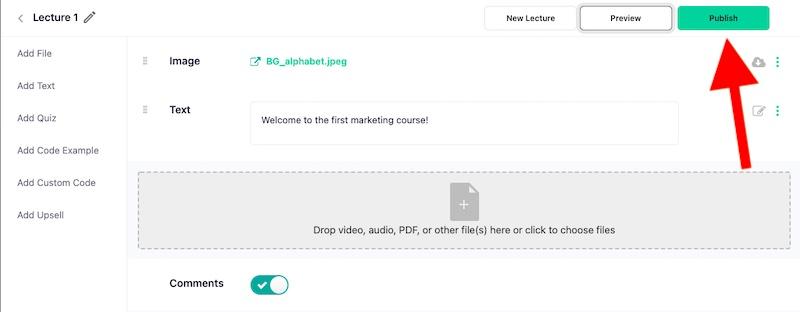
You can also enable comments in each lecture and preview before hitting the publish button. Finally, hit the publish button when you’re satisfied with the results.
The ability to add multiple content types, including quizzes and even custom codes, helps you relay everything you want to your students.
Teachable also allows you to upload content in bulk and from numerous third-party sources, including Dropbox, Google Drive, OneDrive, etc.
The fact that it’s so easy to add content and lectures is a bonus. And you’re moving from one step to another without having to hunt for each tab yourself.
Once you save your lectures, you can start working on other aspects of the course like the sales page, setting up the pricing plans, course website, and more.
Creating Course Bundles.
One of the key elements of Teachables is that it allows you to group courses or coaching products in a bundle. These bundles allow you to sell multiple courses as a single unit.
You can even run attractive discounts for students who choose to purchase an entire bundle consisting of multiple similar courses.
Select the “Bundles” tab under the Products option and then select the Create New Bundle option.

Next, you’ll get prompted to name your bundle and add courses and coaching services you want to include in the bundle. You can add up to 50 courses and coaching services to one bundle.
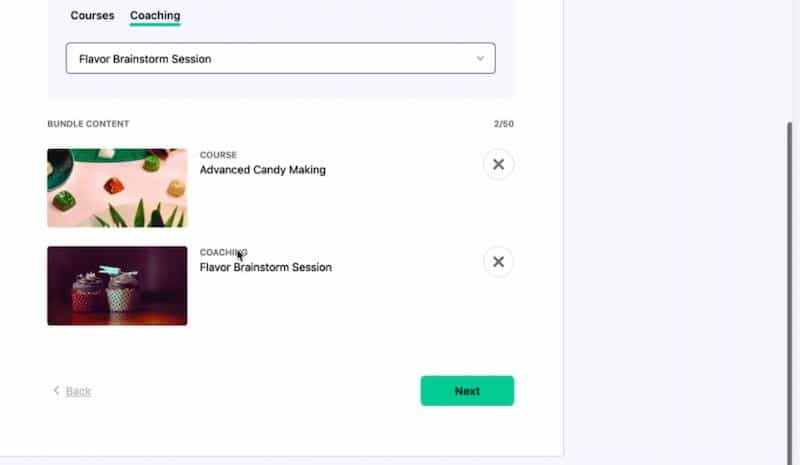
The next step includes selecting a pricing plan for your bundle deal. Teachable allows you to configure four types of pricing plans: Free plan, one-time purchase, subscription (recurring payments), payment plan.
Review your bundle and plan before hitting the “Save and continue” button. You can always change the content of your bundle later.
Finally, you’ll get prompted to edit your bundle’s basic details, including the name, subtitle, and thumbnail. You can now make your bundle visible to your students.
2. Creating Course Pages for Your Online Courses.
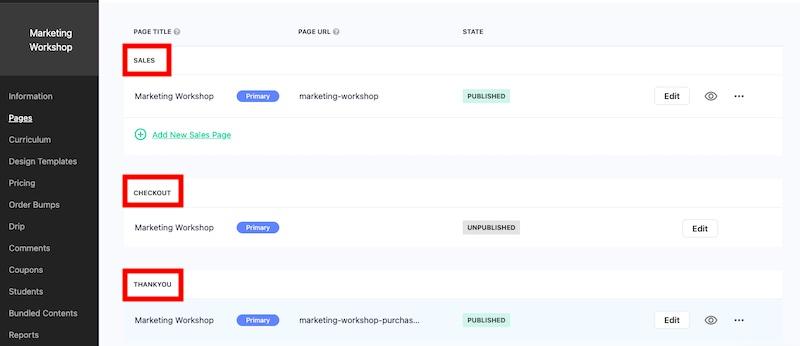
By default, your course comes with three product pages: a Sales page, Thank You page, and a Checkout page.
You can set up or edit these product pages from the Courses > Pages section (find it right above the “Curriculum” section).
Also, note that there are two types of pages: Site Pages and Product Pages.
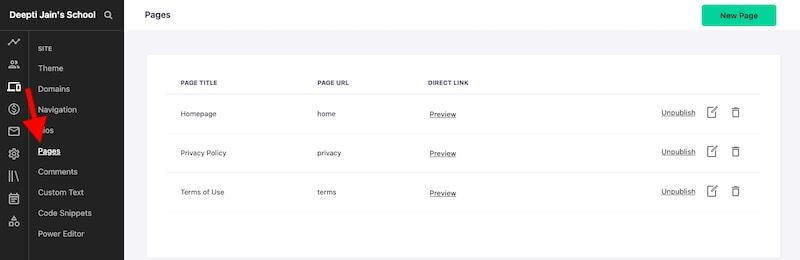
Site pages include a homepage, terms of use, and privacy policy. These are the first pages your customers interact with when they visit your school or course. You can view and edit your site pages from the Site > Pages tab.
Just like Product Pages, these pages also come pre-designed for you.
All these web pages are nested under each product.
For instance, as your students navigate your school, any point they click in the school directory will send them to the sales page. And if you have the pricing block on your sales page, they’ll get directed to the corresponding checkout page. And then the Thank You page.
By default, this is the user flow they’ll experience.
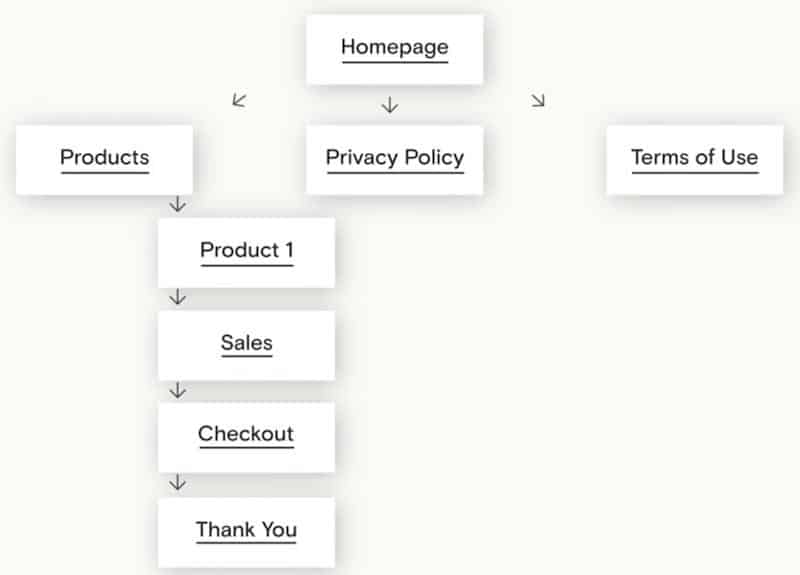
All of these pages are editable by Teachable’s page editor (except for the checkout page).
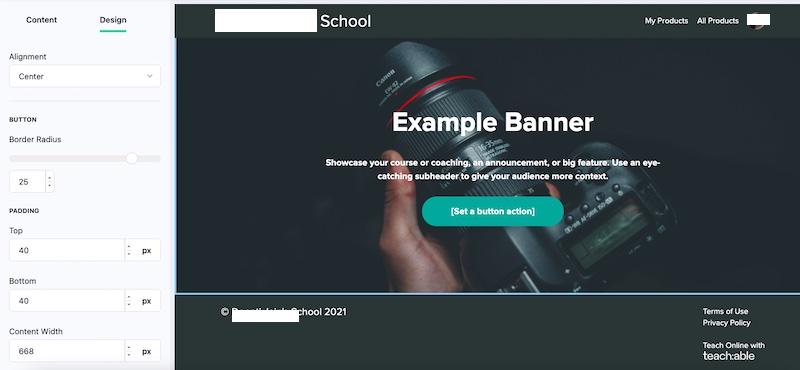
Teachable’s drag-and-drop page editor lets you customize these pre-designed templates and add content to tailor it to your business. Aside from the built-in pages, you can also create as many additional site pages as you want.
Look at the sales page, for instance.
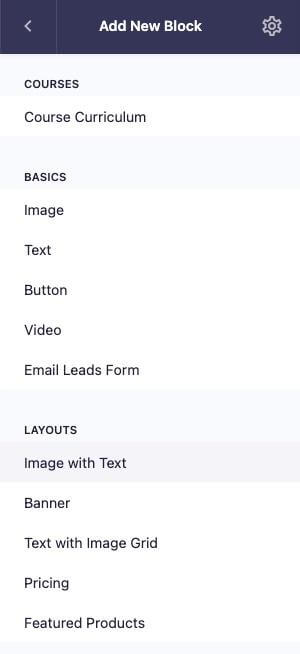
The page comes organized in several page blocks, including Banner, Image with Text, Text, Image Gris, Course Curriculum, etc.
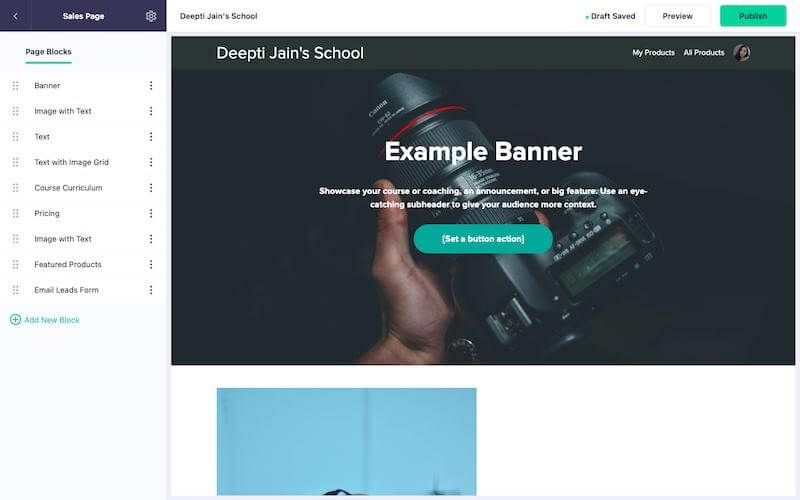
You can delete, customize, and add more blocks from the navbar on the left.
You can also rearrange the blocks by dragging each block above or below specific blocks.
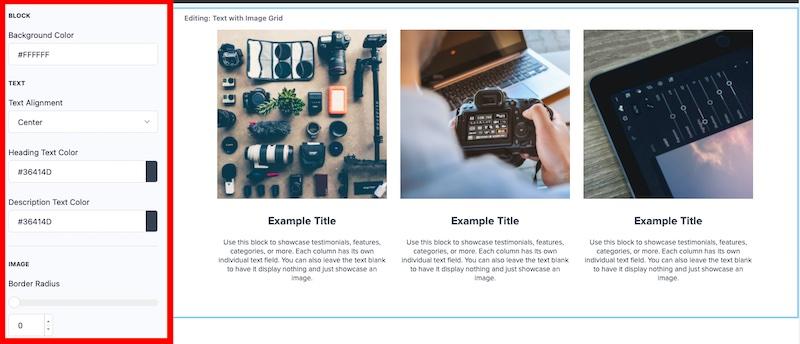
Furthermore, edit each block by simply clicking on it. You’ll get options to modify the content inside the blocks, along with design elements like padding, colors, border-radius, font, etc.
As you build your pages, the editor gives you a real-time preview and auto-saves all of your work as a draft. This way, you will never lose your progress.
Other than this, there’s an additional page called the post intake page built for you if you include an intake process to screen for qualified clients.
3. Building Your Online Course Website.
Now that you are through with your first-course lecture and course pages, it’s time to curate them and set up your course website.
One of the most critical elements to any successful online course is a high-converting website. And Teachable makes it decidedly easy to create and launch your course website.
Here are the elements you’ll get to create and manage your course website:
Course Design Templates.
Teachable offers three design templates: Teachable Classic, Colossal, or Simple. All templates are browser-friendly as well as mobile-friendly.
You’ll find these templates under the Courses > Design Templates section.
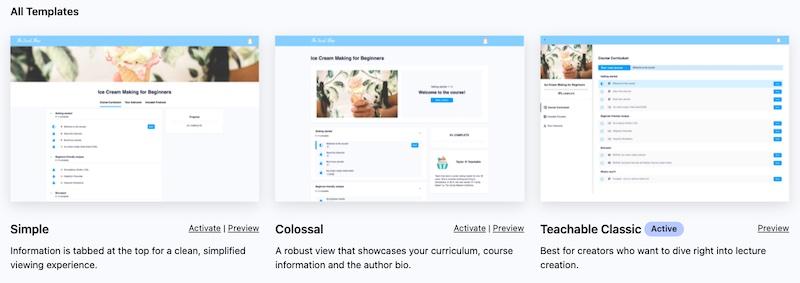
Teachable Classic is suitable if you want to dive right into lecture creation. Colossal will give your students a complete view of your curriculum, course information, and the author bio. On the other hand, the “Simple” template design is for a clean, simplified experience.
You can preview (for mobile devices as well as for desktops) any template before activating it.
Customizing the Website Theme.
While customizing your website theme is straightforward with Teachable, you don’t get many advanced options.
That said, you can align the theme and site pages with your branding elements and colors.
Custom branding options include:
- Set your brand’s logo.
- Custom font.
- Brand colors.
- Set your course’s thumbnail.
- Upload your favicon.
To customize the font, colors, and images, head to the Site > Theme section.
Here, you can even customize the colors across different buttons, elements, and pages in your course or use one of the preset color palettes.

To edit your website text, you have to head to the Site > Custom Text section.
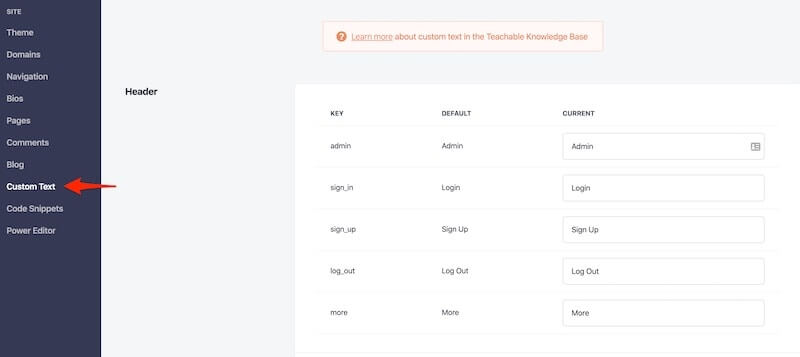
This section will let you modify text in different areas that represent various parts of your site.
Custom text sections include:
- Header text.
- Footer text.
- Checkout page text.
- Courses.
- Lectures.
- Comments.
- Blog page.
- And a lot more.
While it allows you to edit entire website text from a single source, you might find the whole process somewhat cluttered. Alternatively, you can edit the pages separately from the Site > Pages and the Courses > Pages sections.
In addition, Teachable also allows you to add custom CSS or HTML/JavaScript code across all pages on your site.
They even provide a “Power Editor” that allows you to customize your school’s templates and add custom code, including HTML/Liquid and CSS.
However, it’s only available with the Business plan that costs $249 per month.
Configure Your Domain.
Teachable gives you the option to either use the default Teachable subdomain or connect to a custom domain or custom subdomain.
By default, Teachable generates a domain that appears something like: https://yourschoolname.teachable.com
You can access it under the Site > Domain section. You can even change your subdomain any time you want.
This domain is available with all Teachable plans (along with free hosting), so you don’t have to pay for an additional domain.
If you want to keep your branding, you can purchase and connect your own domain to your Teachable course. However, note that the custom domain option is only available with the paid plans. The free trial only lets you use the auto-generated domain.
Navigation and Site Pages.
Just like pre-loaded site pages, Teachable also comes with auto-generated navigation links.
For example, your students will get directed to your school’s homepage by default. Although, you can alter the default homepage and other navigation links.
To do that, head to the Site > Navigation section in your dashboard.
First and foremost, you can choose what page acts as your school’s homepage. You can set different homepages for logged-out and logged-in users.
Right after that, you can add custom links to appear in your site’s navigation bar.
Finally, you can add custom links to appear in your site’s footer.
Teachable also comes with pre-loaded site pages (Homepage, Privacy Policy, Terms of Use). You can access and modify them from the Site > Pages section.
You can even build new pages using the Page Editor.
In the Page Editor, you’ll find all of the content blocks you need to build your page. It also allows you to upload your content and make customizations by adjusting padding and content width.
And as you build your content, the editor gives you a real-time preview and auto-saves all your work as a draft. It’s a helpful feature that prevents going back and forth to view your editing results.
You can also create as many pages as you want and connect them via your header or footer navigation.
It’s all pretty straightforward. Create pages from the Site > Pages section and then configure the navigation from the Sites > Navigation section.
4. Setting Up the Payment to Sell Online Courses.
Teachable has a built-in payment system so your students can compensate you for your course material.
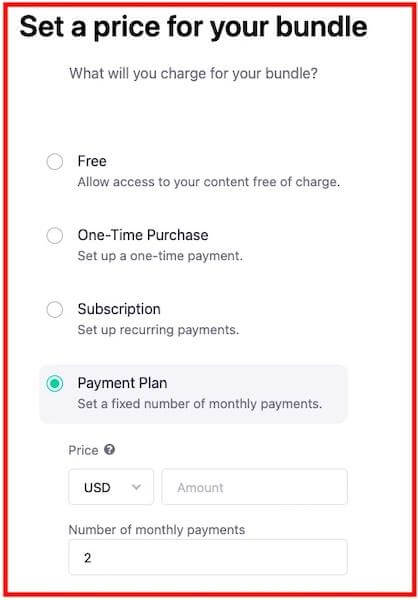
You can add four different types of payment options:
- Free Plan – Offer your course for free.
- One-time Purchase – Set up a one-time payment.
- Payment Plan – Set a fixed number of monthly payments.
- Subscription – Set up recurring payments (every week, every two weeks, every month, every three months, every six months, and every year).
Setting up the payment is also quick and straightforward with Teachable, and you can do it in a few steps from the Course > Pricing tab.
Once you settle on a payment type, you’ll have to add some basic details about your new pricing options.
Here are the details you’ll have to fill in:
- Price – You can choose from near-unlimited currency options and then enter your desired price. $0.99 is the minimum amount that you can enter.
- Name – You can give a unique name to your plan (For example, Professional Plan).
- Subtitle – A short description of your pricing tier.
- Detailed Description – Add any information on enrollment and what your students can expect from the plan.
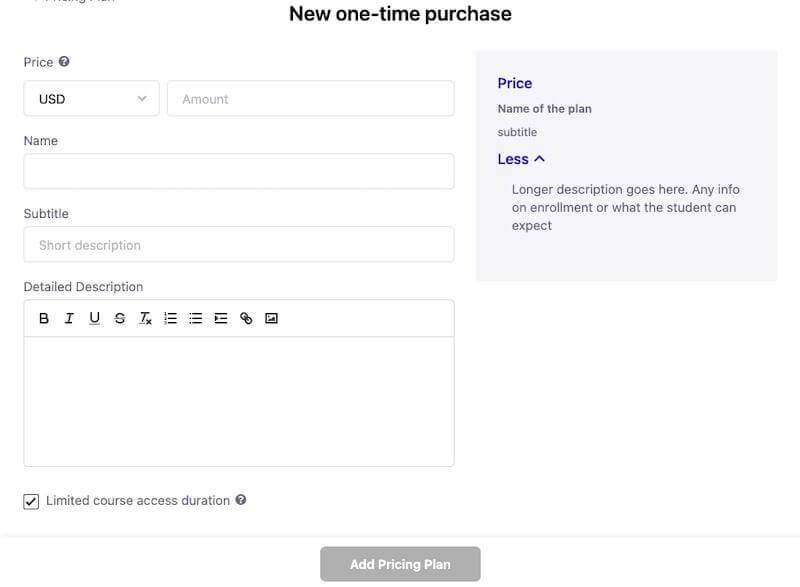
You can also set a limited course access duration. Students will receive access to the course for a specified amount of time, after which they will lose access to all content.
You can also configure multiple-tiered pricing with Teachable. However, there’s no direct way of doing it. You’ll have to follow some steps (including duplicating and bundling your courses) to create a tiered payment plan.
Luckily, Teachable has a step-by-step guide in their knowledge base to help you create multiple pricing levels.
When it comes to collecting the payments, Teachable allows credit card and debit card transactions as well as PayPal and Stripe payments. However, you can accept payments either via credit/debit card or only through payment gateways like PayPal and Stripe.
VAT Inclusive Pricing.
Teachable displays VAT-inclusive pricing on your product sales page by default. Your students will also see it as a line item in the order summary of your checkout pages.
You’ll just have to add your VAT ID to the Settings > Taxes section from your dashboard. Teachable will also use your VAT ID when filing our own EU VAT regarding your school’s subscription plan payments.
5. Email Marketing.
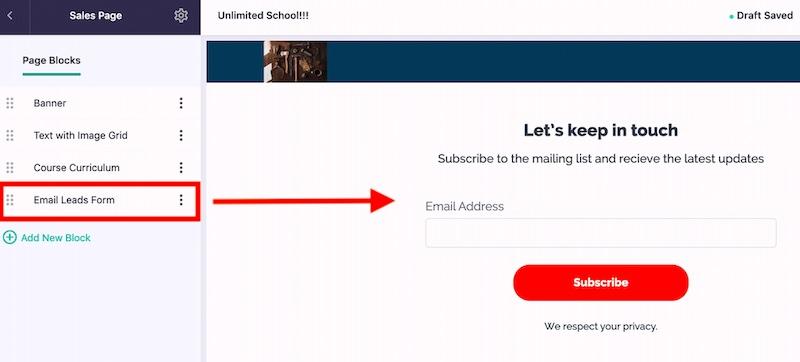
First, you can embed email lead forms in your sales page and use them to collect leads and potential students for your school.
You’ll find a ready-to-use “Email leads form” block while building your page.
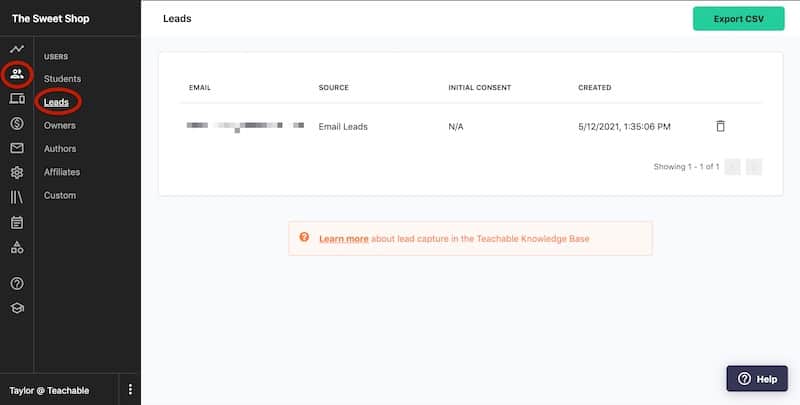
After setting up the form, head to the Emails > Setting tab to enable or disable the Double Opt-in for Leads. This means whether you want to send your leads a confirmation email to verify their email address or not.
You can then manage your leads from the Users > Lists section in your admin area.
Teachable also has an in-built email sender that lets you email individual users, users enrolled in a specific course, or everyone in your school.
Simply head to the Emails > Compose section to compose your email and send it to your leads.
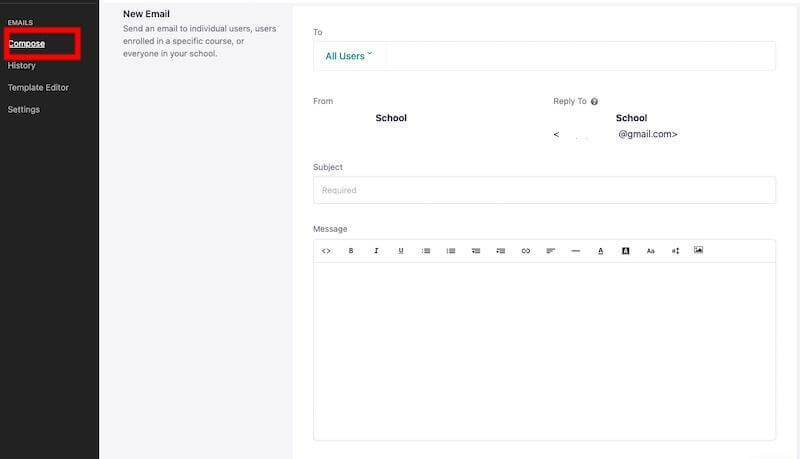
There are also options to disable HTML templates, create emails through custom code, and send test emails.
You can even view your complete email history from the Emails > History tab.
And this pretty much sums up Teachable’s email marketing capabilities. While Teachable doesn’t offer more advanced email marketing functions, it’s suitable for beginner course creators.
That said, Teachable does provide native integration with some of the best email marketing platforms like MailChimp and ConvertKit.
If you require more advanced marketing pipelines and email marketing funnels, then go for Kajabi over Teachable. You might want to check out my in-depth Kajabi review and the comprehensive Teachable vs. Kajabi comparison to make the final decision.
6. Additional Sales and Marketing Features.
Teachable’s marketing suite helps you acquire new students, grow your mailing lists, and convert site visitors into paying customers.
Here are all the features you can use to make sales and engage students:
Drip Content.
Drip content is a form of content marketing where you release small batches of content to your audience over time.
Teachable lets you publish lecture sections on specific dates or a specified amount of days after a student enrolls in your course.
Configure your drip content from the Courses > Drip section.
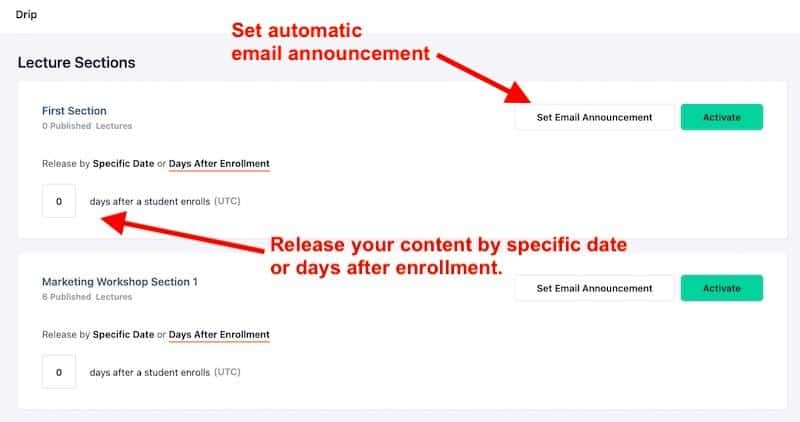
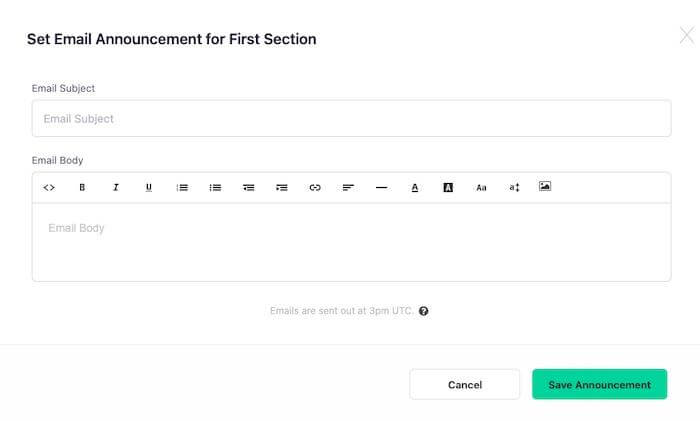
You can even include email announcements letting your students know when a new section gets released. It will help you engage your students and nurture leads systematically.
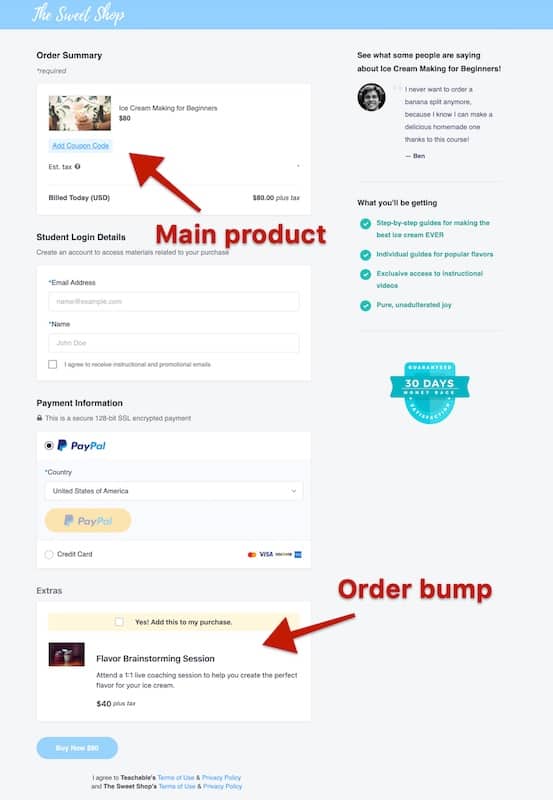
Order Bumps.
Teachable lets you add order bumps to the checkout page of any of your courses. It has the ability to increase order values surprisingly close to checkout, helping you make more money from your course.
With this, customers can purchase the products you promote above your original product (which will get delivered first). This feature enables you to sell more of your existing products to your audience and, therefore, increase total online sales.
To create order bumps for your Teachable course, head to the Course > Order Bumps section from your dashboard.
Hit the “Create Order Bump.” Next, you’ll get prompted to choose the pricing plans associated with the course that should have an order bump.
After that, choose your order bump product and order bump pricing plan.
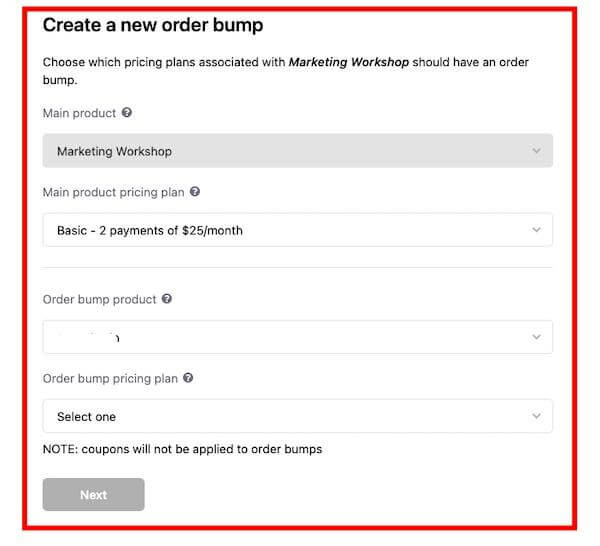
Here’s an example from Teachable’s knowledge-base:
The order bump pricing plan may either be a one-time purchase or a subscription of the same payment.
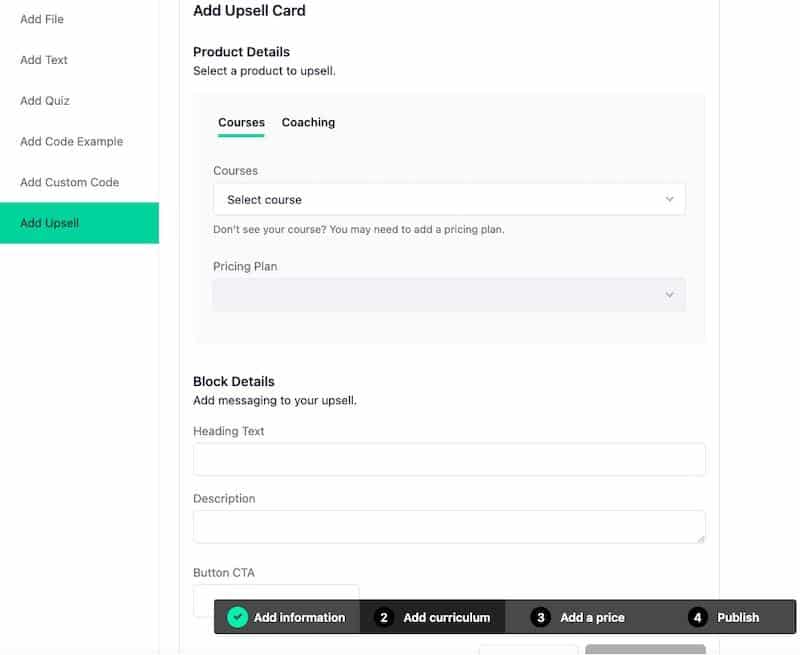
Upsells.
Teachable has a great feature called “upsells,” which you can use to prompt students to purchase related or bonus courses. Upsells make it easy to add an additional revenue stream and offer something valuable to your students.
If you want to offer a supplemental course or service directly during the checkout, consider using Order Bumps instead.
On the other hand, Upsells help you promote an additional product in a specific lecture or even after the purchase (using a Thank You page).
You can add an upsell by navigating to Courses > Curriculum > Add Upsells from the admin area.
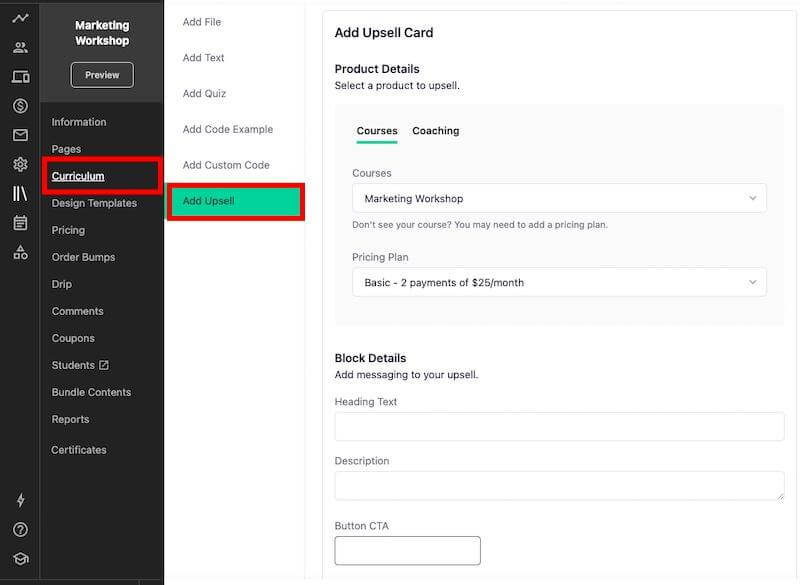
Aside from standard product details, you can also add a description to your upsell and a CTA button.
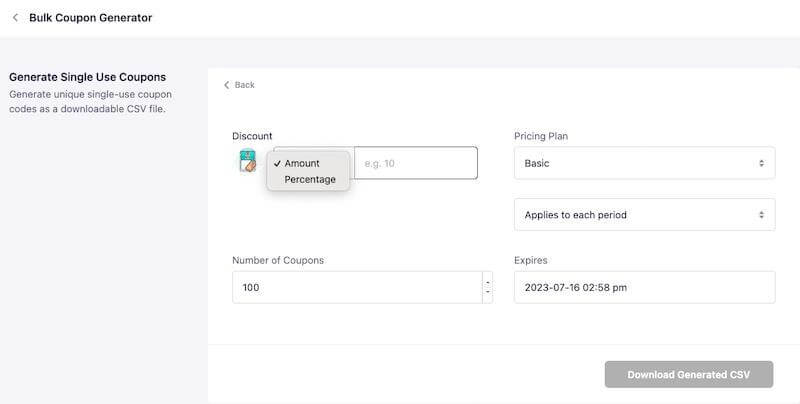
Coupons.
Teachable helps you treat potential customers with a coupon. You can create coupons for a specific course or even in bulk for every course in your school.
These coupons come in the form of a set amount or percentage off.
Pre-selling.
Pre-Selling your course helps you to promote, sell, and deliver your product before the final launch. You can even pre-sell your course before even completing it.
It’s an easy way to increase the perceived value of any product or service you’re selling. You can even get in touch with potential audiences and gain insights into what lectures and information they’d prefer in the course.
You can follow this guide by Teachable to configure your pre-sell sales page and pricing structure. The process remains similar to creating a regular sales page.
Students Discussion.
Teachable comes powered with a “Comments” section that allows students and instructors to interact with one another. You can enable comments for a lecture inside the curriculum editor.
To toggle comments moderation and multi-threaded responses, go to Settings > General from your dashboard.
From the general settings, you can enable or disable:
- Comment moderation – Comments will need to be approved by you before they show up.
- Multi-level threading of responses – Multi-level threading of responses lets users reply to a specific comment.
- Comment attachments – Allows users to attach an image to their comments.
You can encourage your students to keep an active, structured community to participate and ask questions.
Student Certification.
The certification feature enables instructors to assign a certification on completion of an online class or course.
You can choose from three certificate templates or create a custom certificate using LIQUID/HTML.
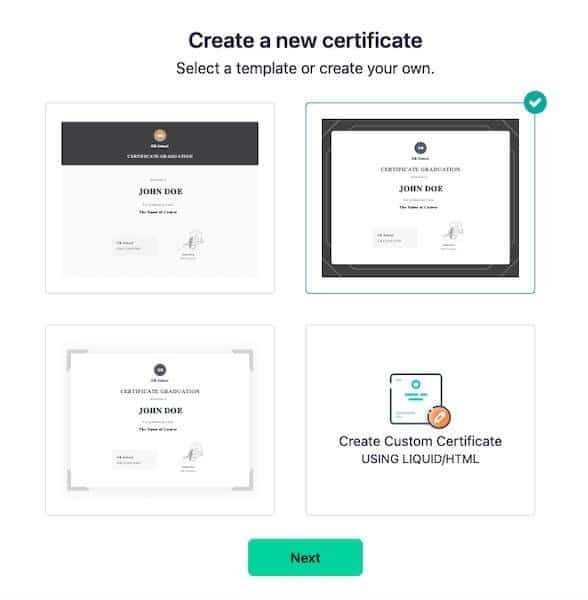
You can further edit the template. The course certificate editor lets you alter the colors, design, text, and more.
Also, you can only have one active certificate at a time. And the active certificate will get issued automatically when a student completes a course.
This feature ensures that the students taking your paid courses are there because they have a genuine interest in the subject matter. It also makes your course appear more professional and helps you acknowledge your students.
6. Live Classes.
Teachable allows you to host live classes to give and receive real-time feedback and interact with your students. This allows for more organic engagement and personalization that you can’t get from traditional video tutorials.
However, Teachable doesn’t allow you to live stream natively. You have to connect with third-party streaming platforms like Twitch, YouTube, and Vimeo.
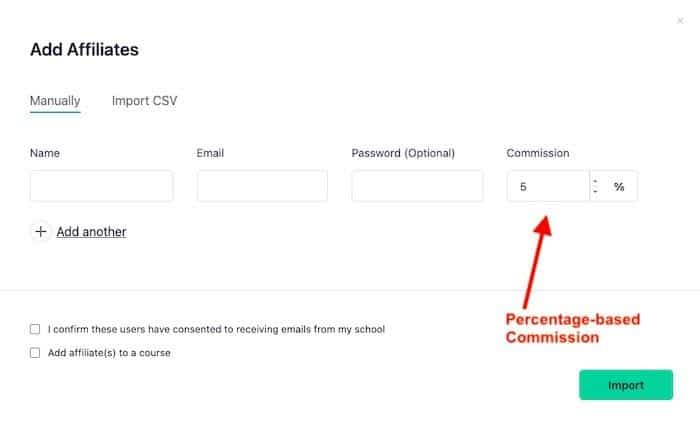
7. Affiliate Marketing.
Affiliate marketing is one of the most popular ways to make money online. And affiliate marketing with Teachable is easy to set up, simple to use, and flexible enough to fit into any business model.
You can either add affiliates one at a time or import a CSV file to add affiliates in bulk. Teachable also lets you designate a student as an affiliate and allows you to add and track referral codes for any of your courses.
Although, you can only pay percentage-based commission to your affiliates rather than a fixed figure.
8. Track Sales and Students Insights.
Analytics and reporting are the key factors in knowing where you’re at and what you need to do next to grow. Teachable allows you to track your sales and student reports – no additional plugins or software required.
You’ll get access to two types of reports – to track students’ progress and engagement and gain insights into your sales metrics.
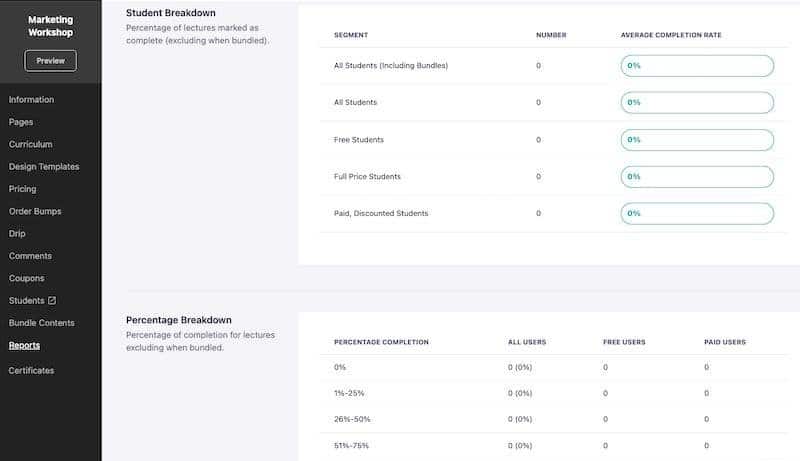
To get access to your students’ reports, head to the Courses > Reports tab.
Here, you’ll get access to straightforward and easy to understand student metrics like:
- Lecture Completion – Percentage of lectures marked as complete (excluding when bundled).
- Video Stats – See average video engagement, plays, loads, and more. This report gets generated once you add videos to your lectures.
- Quiz Scores – See average student quiz scores and completion rates. This report gets generated once you add quizzes to your lectures.
- Course Leaderboard – Get access to a ranked list of students in a specific course by completion progress.
- Video Engagement – View aggregated video engagement metrics, including total hours watched, number of plays, and more.
You can also track your sales from the “Sales” tab itself on your dashboard.
Sales-based reports and analytics include:
- Transactions
- Statements
- Breakdown (Daily and the monthly number of sales, sale price, affiliate, and author revenue share, and your earnings).
- Upsells
Teachable records sufficient insights into your sales and student submissions metrics. Although, you won’t be able to access insights into metrics like login frequency, conversion rate, etc.
Also, you have to upgrade to a pricier plan to access advanced metrics.
9. Third-Party Integrations.
Teachable allows integration with several third-party platforms that can make your course run like a well-oiled machine.
Here are some of the most prominent native integrations provided by Teachable:
- Google Analytics
- Facebook Pixel
- MailChimp
- ConvertKit
- Sumo
- Segment
- Circle.so
- Zapier
Plus, Teachable supports Webhooks that allows you to send information from your Teachable school to other online applications.
Teachable Pricing Plans.
Teachable comes with three paid plans and a 14-day free trial.
Here are the paid plans offered by Teachable:
- Basic – $29 per month/billed annually (two admin-level users)
- Pro – $99 per month/billed annually (five admin-level users)
- Business – $249 per month/billed annually (20 admin-level users)
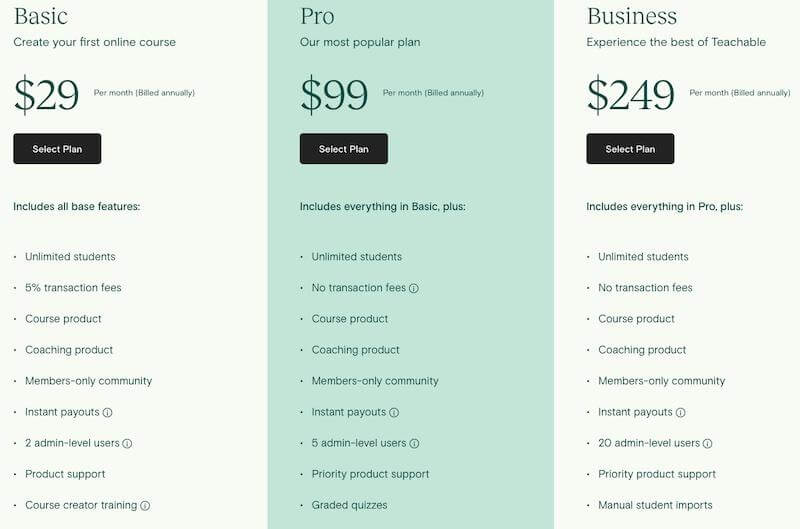
All of the plans come with some standard features, such as:
- Unlimited video hosting.
- Unlimited courses and hosting.
- Integrated payment processing.
- Student management.
- Lecture comments.
- Basic quizzes.
- No fees on free courses.
- Value-added-tax (VAT) for EU countries.
However, some features vary with the pricing structure you choose. For example, they charge a 5% transaction fee on the Basic plan, while there’s zero transaction fee if you opt for the Pro or the Business plan.
Plus, the Pro plan offers advanced features like graded quizzes, advanced reports, course completion certificates, integrated affiliate marketing, and group coaching calls. You won’t get these features with the Basic plan.
The Business plan offers some more features that are not available with the Basic and Pro plans. It comes with manual student imports, bulk student enrollments, custom user roles, and advanced theme customization.
Teachable Customer Support.
Teachable has a decent knowledge base with guides on every topic and feature they offer. There are enough how-to guides and articles on creating and setting up your products to make your course building a breeze.
It would be even more helpful if Teachable included video tutorials in its knowledge base. That said, you’ll find self-help guides sufficient in most cases.
If self-help articles aren’t sufficient, you can reach out to their team via:
- Submitting a ticket (seven days a week, 8 AM – 8 PM ET)
- Live chat.
- Email.
Teachable Pros & Cons.
Teachable is a solid choice if you want to start a business online or build an online course. However, like with most things, there are some pros and cons that you need to be aware of before you get started.
Here’s a quick overview of some of the benefits and downsides of using Teachable.
PROS | CONS |
|---|---|
|
The dashboard is easy to navigate and makes it easy for a beginner to create online courses. |
Not enough website theme customization options. |
|
Integrated affiliate program. |
They recently discontinued their blog feature. |
|
Additional selling/conversion and marketing tools like upsells, drip content, order bumps, and coupons. |
You might have to wait up to two months before you receive the payouts. |
|
Unlimited and free video hosting. |
Student interface isn’t as intuitive as other contenders on the market. |
|
Built-in certificate creator to acknowledge your students. |
Executive Summary.
The Teachable platform is a complete package for online course creators who want to build and sell courses from scratch.
You don’t require any special tech skills since the platform is straightforward to use. One of the most significant selling points is its ability to create a course with quizzes, documents, and video elements. Step-by-step insights into the whole process are also a bonus.
Some other benefits of the platform are unlimited hosting, custom branding, and low price.
Teachable is suitable for you:
- If you are on a budget and need a simple solution to build your course.
- If you’re new to the course creation process and want to create a course in a few steps.
- If you want to engage your students using quizzes, comments, and live classes.
- If you’re heavily relying on videos in your course.
- If you want to increase your course sales with features like order bumps, affiliate marketing, etc.
- If you don’t have your own website.
This pretty much sums up the Teachable review.
Further reading on AdamEnfroy.com: LearnWorlds is another platform that can help you build and sell online courses.
In my LearnWorlds review, I go over the features, pricing, and much more, showing you all this platform offers.
Last Updated on May 8, 2024 by Adam Enfroy